Commission Painting and Pricing

Yes, I do take commissions.

Infantry are $15 a model, regardless of size, up to 32mm round base.
Large Infantry and Cavalry are $30 a model, up to 50mm round base.
Extra Large Infantry are $45 a model, up to 60mm round base.
Vehicles are based on size:
$150 for 40k dread sized (60mm base)
$200 for 40k Rhino chassis or similar, smaller fliers (Storm Talon)
$400 for 40k Land Raider, larger fliers (Storm Raven).
Forge World and Collossals - prices vary

These prices include all assembly and basing. If you already have models assembled, primed, or want to do the basing yourself, please contact me and we can talk about reducing the price.

What you get for your money - models will be cleaned of any mold lines and flash, assembled, primed, painted, based, and matte varnished for protection. Will always be beyond the 3 color minimum for tournaments, and will include the little details that we all want. I will paint an army for you that I would be proud to play with myself. I will do custom color schemes, as well as traditional "from the book" schemes. I only have one level, and that is fully painted.

About Me

I paint models and have been doing it since I was 12. Over the years I have learned tons of tricks and painted loads of models. I have ran a very successful Miniatures studio, and owned a Retail Game Store. After closing those, I decided to get a little smaller with the operation and I am back to a one man show.

Search This Blog

3/31/13

Sneak peak - Custom HQ models for the Deathwing!

Okay, to be quite honest, I was supremely disappointed with the new Belial model and have always hated the Terminator Librarian model.

Come on, Belial is pigeon toed and is a static as a second edition HQ model.  AND the pose is just LAME!.  The Terminator Librarian is a pretty cool model, but there is only the 1.....Sure you can change his hand out, but absolutely no poseability - and he does not look very Dark Angelic (yes, that is a word....).

And at $44.50 to get 2 Terminators, I figured I was better off making my own (enter buy a $50 Terminator Box and mix the parts into a DW command box to fill out a squad - leaving me with 5 extra Terminators to play with).
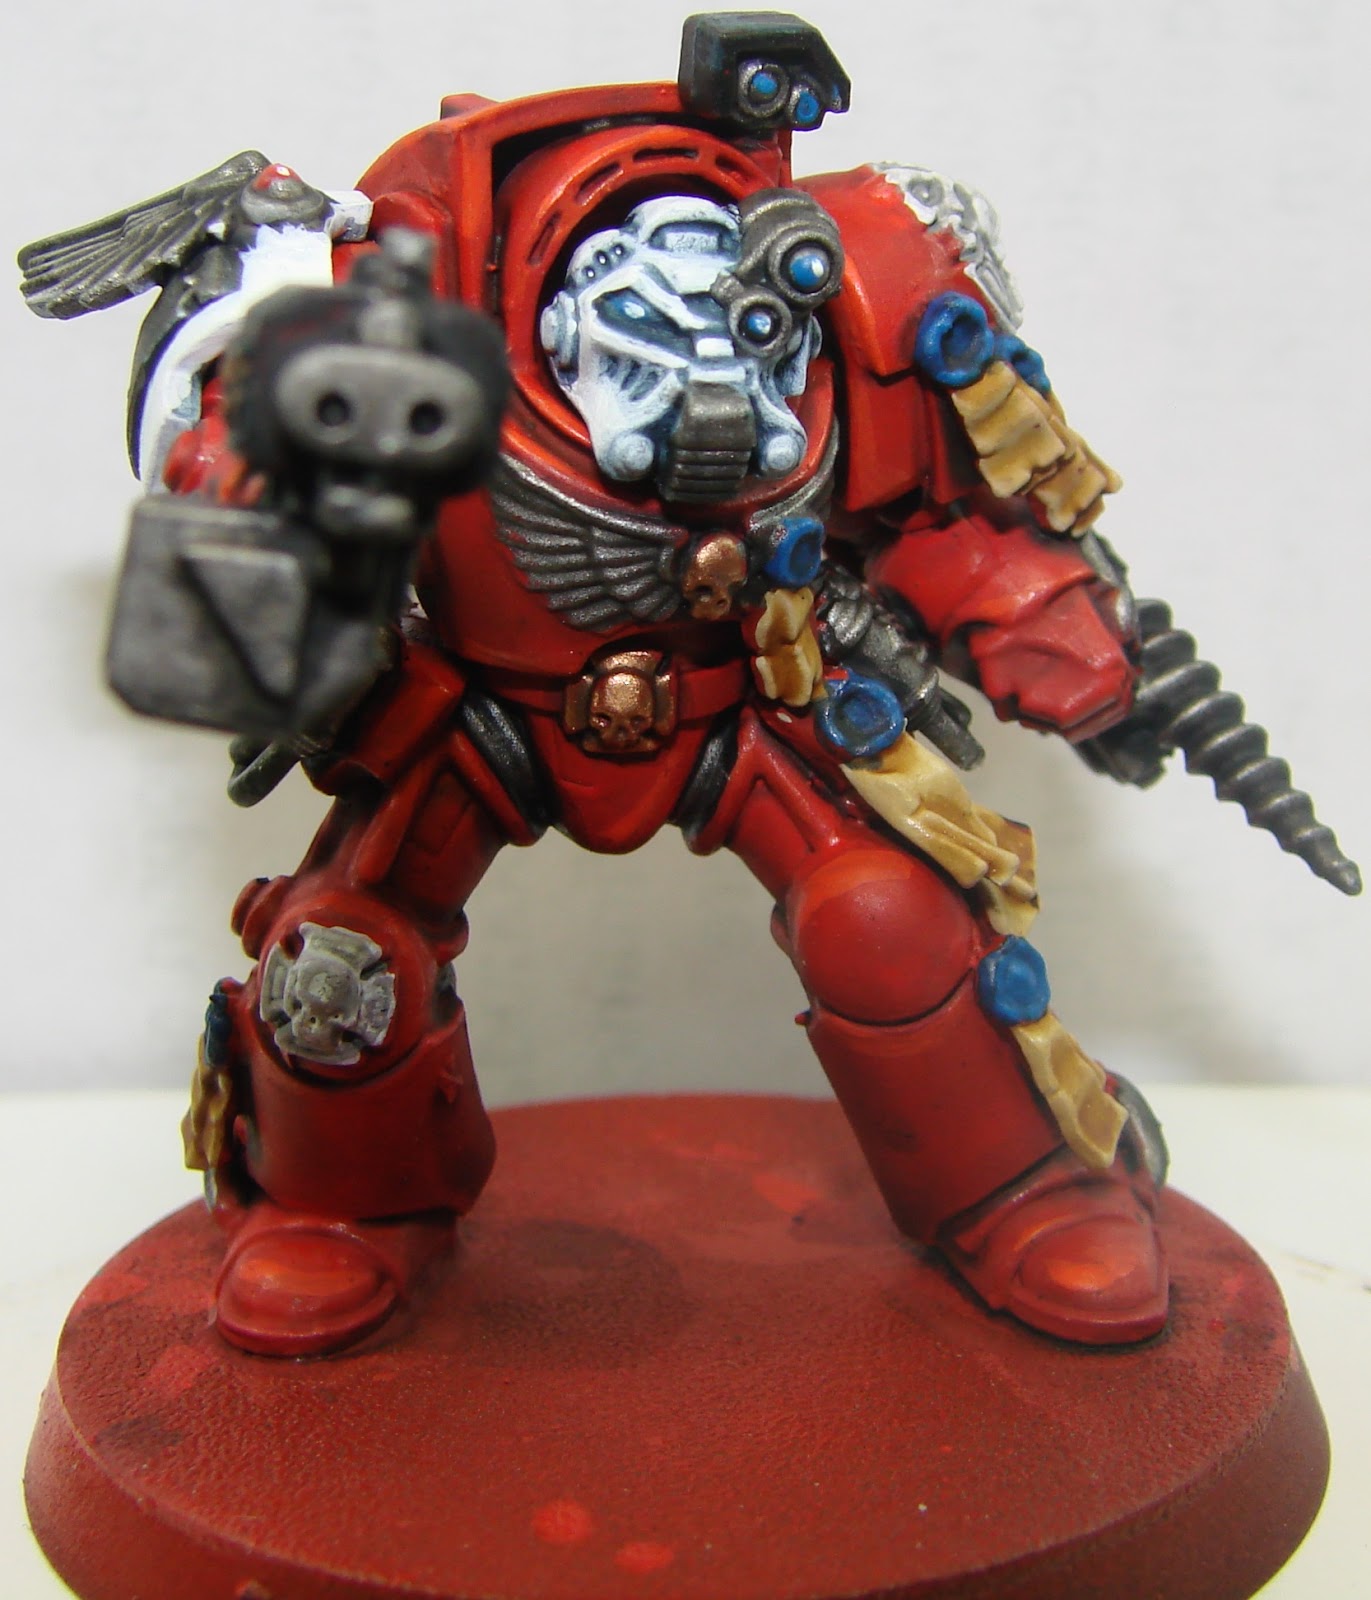
Enter Belial


He was build using a set of Deathwing legs,  Upper body, helmet, outstretched Storm Bolter arm, and right arm.  I used the banner pole from the Space Marine Command Squad, a powersword from the GK Terminators box, and then a bunch of purity seals.  He will have the cloak from the command squad, and a teleport homet token that I will use to mark where I am dropping a squad.  If you notice he has no shoulder pads, this is because I am awaiting my Forge World Order that will have those in it.  I will use one set for him, the custom Libby, and then 3 members of the DW command Squad.

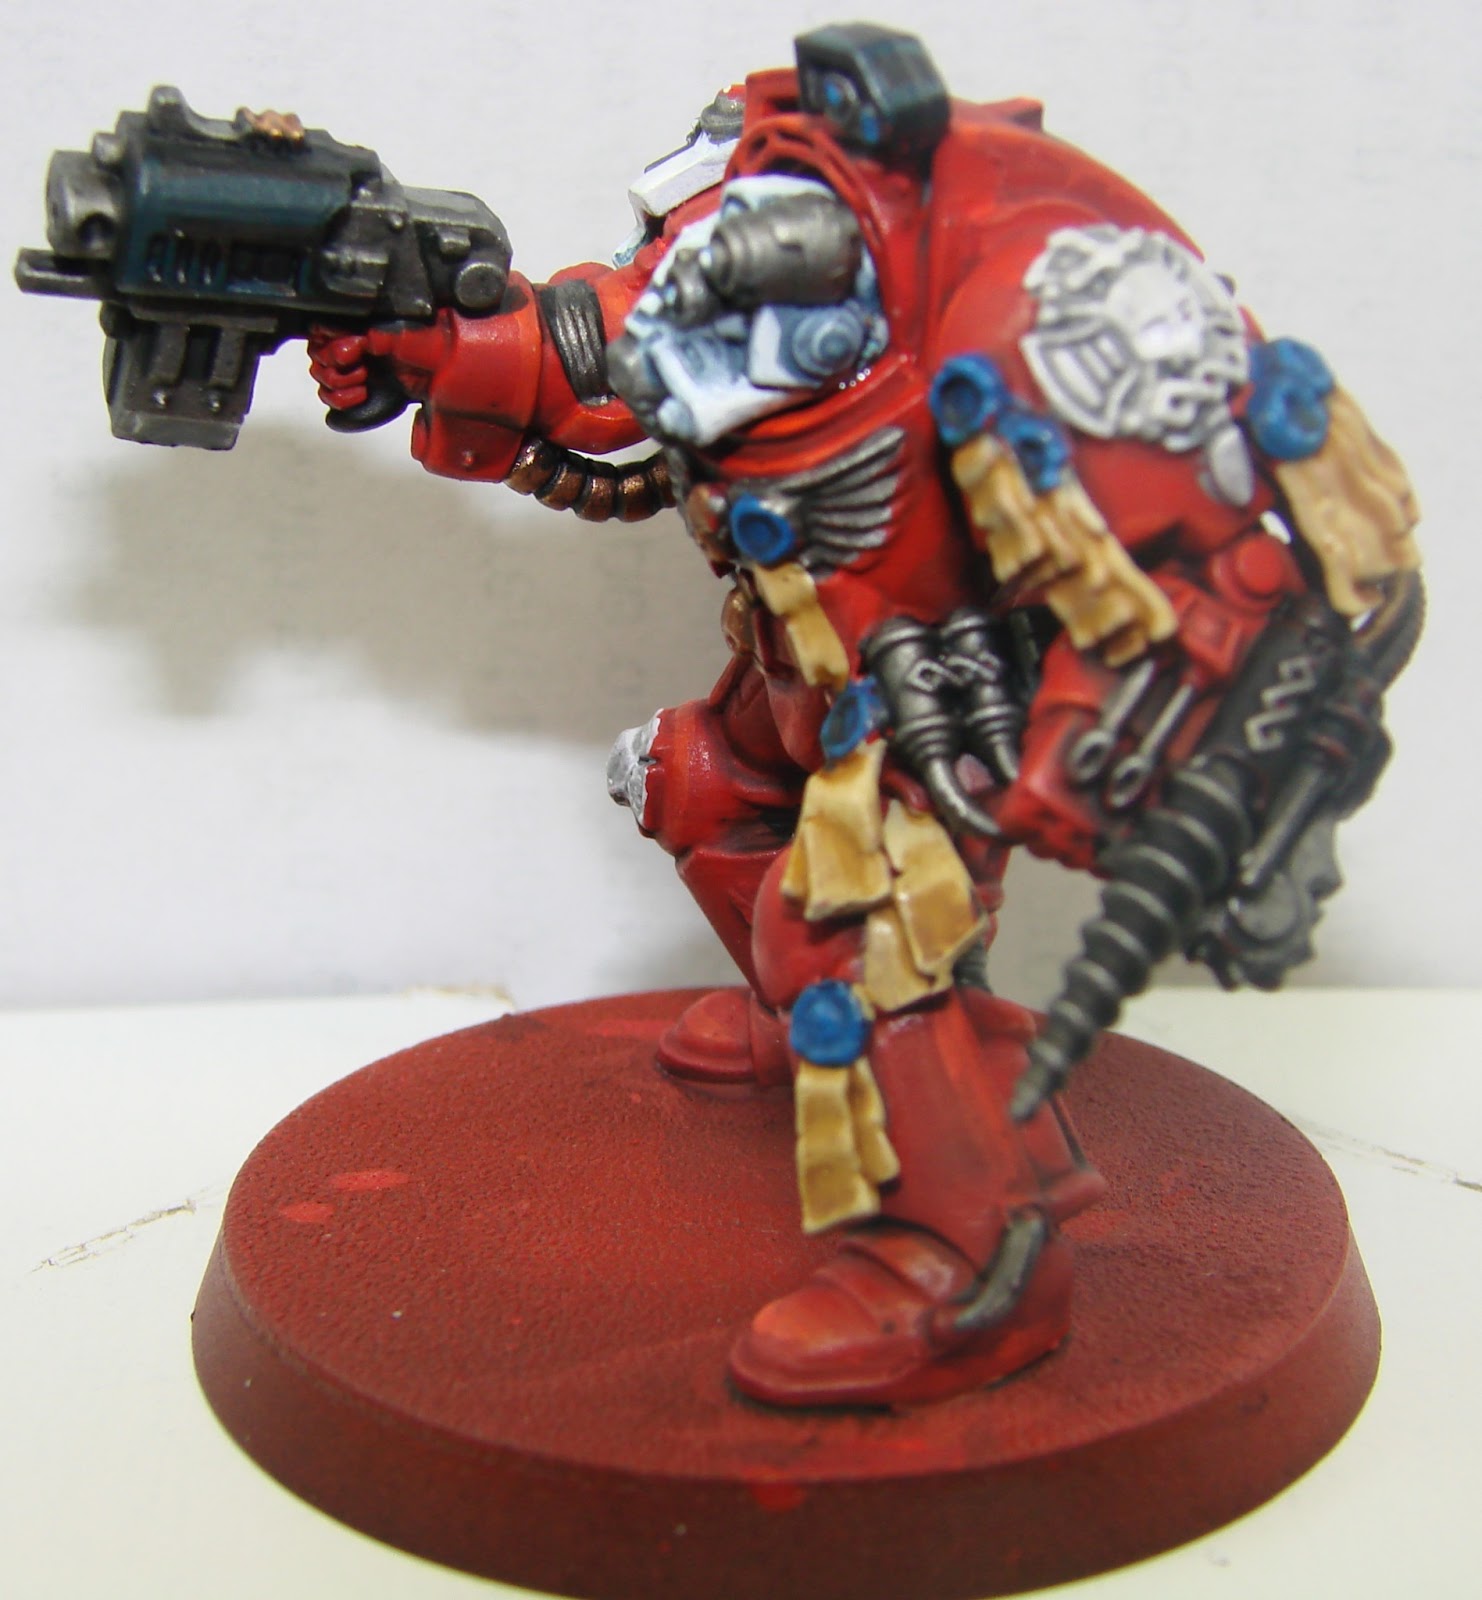
Custom DeathWing Librarian


He was a bit more involved. Sergeants Leg and torso back. Torso front is from the DW command box, as is the head.  Back icon is from the Space Marine Command box.  The servo skull, warding staff, and both arms, including wrist mounted Storm Bolter are from the GK Terminator box.  I added a bunch of purity seals again.  I was not happy with the original look and so I swapped to the GK arms. Again, his shoulder pads are inbound from Forge World.

A quick note on mixing the DW box parts with standard Terminator parts - they don't match up exactly.  When mating the DW chest plates to Terminator backs, you have to cut away some of the mounting tabs to allow the parts to join fully.
Here is a shot of the parts just stuck together, no glue, no trimming.

Here is a shot with the tabs trimmed down.  Almost perfect.  I still ended up trimming off some more to get them to mate up.  The tabarded fronts are a real pain, as they are mad to work with a specific set of legs from the DW box.  You have to do some creative bending of the tabard, and, if you are not careful, will end up with some strange poses to your models!


What??? Another Tutorial? That's like 3 in a row!!!!

Well, I guess I have been on a bit of a roll lately.  First off, with the amount of models I have painted, all to a "way better than tabletop" quality.  Actually, if I were doing the levels thing, they would all be level 2/3ish. Secondly, with my blog posts.  I have found that I am starting to think about snapping pics as I go through the processes and want to document them.  For the past year, it has not been this way.

So here we go again - pretty simple one, but one of the hardest colors (or lack thereof) to paint effectively and have it look good.  White.

Here is the issue with white.   It is hard to get it to look smooth.  Not terribly, but time consuming yes.  And most painters (or at least the ones I have talked to) have an issue shading white.

Okay, so here is what I did to get the white helms on my Blood Drinker Terminators


I went with the white helmets because, thus far, I have yet to paint a red helmet, and will avoid it if I can.  Looking at the pictures in the codex and only, the red helmets on the terminators make them just blend into the rest of the army.

So to get the helmets white, here are the steps I took:

Step 1 - Prime it white!  I assembled the models, and left the heads off, still attached to the sprues.  I primed the models themselves in red, and then primed the heads in white.  You don't have to do this, but it does make it easier to get the helmets to a pure, very smooth, white. If you prime in colors, or in black, be prepared to use paint on primer or a really light (think foundation) paint to get the undercoat back to a white friendly color.


Step 2 - Wash with blue.  I used the old GW Asurmen Blue (Drakenhoff Nightshade).  You want to shade with blue as it is a "cold" shade, and feels the most natural when viewing.  I have seen white shaded with black, and it is not pretty....makes the white almost look dirty.


Step 3 - Using heavily thinned white paint, repaint the areas white, being SUPER careful to leave the blue washed white primer in the cracks.  I say super careful as if you accidentally cover the cracks, you either have to paint wash back into that crack to clean it up, or bust out a quick black-line to salvage it.  Repeat this until the white looks smooth. If you notice the three "boxes" left on the cheek - the Indomitus Pattern Tactical Dreadnought Armour has three vents on either side of the helmet, which were strangely not molded into the helmet.  To help from just having a plain white area, and to break up that long dark "patch", I painted vertical lines to give the appearance of the vents.  In the squad picture, you can see these very clearly. The very last step was the eyes.  I used Cygnar base to block out the eye, Cygnar highlight toward the front of the lens, and then a white dot towards the back of the lens.  Finished this up with a Asurmen wash, again, being very careful.

Now just glue the helmet in place and off they go!!!!


As a side note, I found a cool tutorial for painting helmet lenses that I want to try out.  Might do this sometime later, maybe when I am doing the re-work on my Space Wolves!

Blood Angel (Blood Drinker) Terminator Sanguinary Priest

Well, it seems I have been in the mood to paint Terminators lately.  With the 21 I have with for my Space Wolves (Logan Wing army), And currently 17 for the Deathwing (adding 10 more tomorrow), I decided to put together a Terminator squad of 5, plus a Sanguinary Priest for my Blood Drinkers.

I used standard Terminator parts, and added the Apothecary upgrade arm, head, and vials from the Deathwing Command box.  I still have another Apothecary setup floating around from a Grey Knights boc, but I really liked the integrated Crux pad on the DW arm.

I painted this model using the same techniques that I used in the Blood Drinker Tutorial here and here.


I slathered on the purity seals.  I am pretty disgusted with GWs apparent lack of any Army or Chapter Specific upgrades for Terminators.  Sure they have Deathwing and Wolf Guard, but any other chapters are pretty much SOL unless you want to order Forge World stuff for them.  I mean, can't we get a few more blood drops and stuff that would fit on Terminators in the Death Company Squad sets?

Oh well, enough grumbling.  I really like the way that the white on the helmet and the shoulder pad came out.  Unfortunately, I cannot say the same for the shoulder pads of this dude's squad.......The yellow came out great, but I tried some free hand stuff and they ended up looking like a 5 year old tried to do it......So they get blacked out, highlighted and washed, and then I wait for the Blood Angel Decal Sheet to get here from Forge World.   That thing has Blood Drinker icons on it!!!

Tomorrow, time permitting, I should be able to get another DW squad knocked out.  I would love to paint the Custom Belial and Librarian models that I have made from plastics, but I have to wait for the DW shoulder pads get here from FW. :( Frowny Face!

3/28/13

Blood Drinkers Tutorial - Part 2.

Okay, so the reds are all done, and I am moving on to finishing the squad.


Step 7 - Black out all areas that are to get painted with metallics.


Step 8 - Apply metallics, and once dry, apply a thin wash of Nuln Oil.


 Step 9. In the chosen areas, add your other colors.  In this case, green for the head laurel,blue to the purity seals, eyes, and power axe.


Step 10. Wash the blue and green areas with their respective washes.
Step 11. Final paint areas and touch ups.  I touched up with the bronze around the eyes, and then painted the scrolls of the purity seals in white and then washed that with sepia.  For the blood drops, I applied Khador red, then a slight highlight with Evil Sunz Scarlet, with a small dot of white on each drop.  Once matte varnished, these will be painted over with hard coat varnish.

The finished squad.  Well, not exactly.  I still need to finish the jump packs, but the Sanguinary Priest is done.  He uses the winged jump pack from the Sanguinary Guard - the rest will use the Death Company Jump Packs.
 
Well that is all for now.  I hope to be able to do some more tutorial, especially when I get my Forge World Order!


3/26/13

Blood Angels - getting red that is simple and cool looking.

Okay, so those of you that game with me know that I LOATH painting red.  Hate it.  And I hate it because everytime I have painted it in the past, the finished product really looked choppy with the highlights.  You can't mix white into it because then it looks pink, so you have to use orange, and then it looks like your models are on fire.......well enter the GW washes.....both the old Baal Red and the Carrowburg Crimson.  They both provide a good finish to help "blend" all the highlights down a notch to make them look more natural.

Here are the steps to, what I think, is one of the best red schemes I have come up with.


Step 1 - Okay, technically not Step 1, but we have to remember that primer is important.  For all of the Blood Drinker (Blood Angel Successor Chapter) models I have painted thus far, I have stuck with Army Painter Red Primer.  It helps to give a good undertone and is not as hard to cover as the basic black primer, and not as picky as white primer (which can make the models look uber bright, not what I was going for.)

Step 2 - Give a watered down coat, across all main red areas, of Skorne Red (P3).  I like the Skorne Red because of the depth of the color.

Step 3 - Paint on a coat of Khador Red (P3).  This has a more vibrant feel.  It is okay to leave the Skorne Red from last step showing in some of the cracks.

Step 4 - No apply Evil Sunz Scarlet (GW) to the red areas, again leaving the last 2 colors present in the cracks.
Step 5 - Using Troll Slayer Orange (GW), apply an thin highlight to the areas that would be affected by light reflecting.  I typically do not use a "focal" point light source.  I normally just do the edge highlights on the raised edges, as if the light was coming from my eyes to the model. If the highlight gets thick, then thin it back out by using the scarlet from last step to paint the highlight back 
*hint - I do this for black edge highlights**

Step 6 - Now wash the entire red surface with Carroburg Crimson.  No need to water it down, just be careful that you use a light wash, as this wash will darken the model tremendously!

Tomorrow evening, I will finish off the Honor Guard, and provide tutorials on how I am finishing this squad up.

On a side note - **SQUEEE!!!! My Forge World order just shipped!


3/22/13

Because Rich asked so nicely! A Deathwing Terminator Painting Tutorial.

With the latest incarnation of Deathwing models, I have been pressed into service by my wife to get a DW army ready for the table.  Here is a step by step tutorial on how I am doing the terminators, because my buddy Rich Van Meter asked for it :)


Step 1.  Prime white, basecoat in Bone (I use Menoth Base).  Wash with Seraphim Sepia.

 
Step 2. Rebase the Bone, leaving the darker washed brown in the cracks.

Step 3. Edge highlight with a 50/50 mix of bone and white.


Step 4. Reblack out areas that are to be covered with metallics. Go ahead and apply the metallics ( I used a mix of GW and VGC metallics) . Once dry, apply a wash of Nuln Oil.


Step 5. 5 Stage red. Yep - 5 stages to get red onto the model. Apply Skorne Red to any areas that were previously repainted black - in this case the Storm Bolter Housing.


Stage 6. Apply Khador Red over the Skorne Red and to any other desired areas for the red.


Step 7. Apply Evil Suns Scarlet to the red areas, leaving a small crack of the darker red in recesses. Then apply a thin highlight of Blazing orange to the edges and high points.


Step 8. Apply Carrowburg Crimsons wash to all read areas.  I am using this as more of a glaze, but still want it to hit the cracks. And there is the 5 stage red - I have been using this to paint my Blood Drinkers, so will post a walkthrough on them once I have finished this squad of Deathwing.

Almost done!


Step 9. The Crux Terminatus.  Apply a coat of Skull white to the Crux.


Step 10. Take Codex grey and super thin it out with Nuln Oil.  Wash this over the white.  This gives a really nice stone look without resorting to drybrushing.

Go back and add whatever details you want.  I painted the purity seals, lenses for targetting arrays, and the little skulls on all the iconography.  I also went back and trimmed up any areas where I might have been a little sloppy.


The Final Result!

Only 2 more Deathwing squads, a command squad, 2 characters, and 2 Dark Talons to go!  :S

For this squad, I have about 20 hours total into the paint job, not including assembly.  I will post later today about bashing the standard Space Marine Terminators with the Deathwing bits.....it is not as straight forward as you would think.