Commission Painting and Pricing

Yes, I do take commissions.

Infantry are $15 a model, regardless of size, up to 32mm round base.
Large Infantry and Cavalry are $30 a model, up to 50mm round base.
Extra Large Infantry are $45 a model, up to 60mm round base.
Vehicles are based on size:
$150 for 40k dread sized (60mm base)
$200 for 40k Rhino chassis or similar, smaller fliers (Storm Talon)
$400 for 40k Land Raider, larger fliers (Storm Raven).
Forge World and Collossals - prices vary

These prices include all assembly and basing. If you already have models assembled, primed, or want to do the basing yourself, please contact me and we can talk about reducing the price.

What you get for your money - models will be cleaned of any mold lines and flash, assembled, primed, painted, based, and matte varnished for protection. Will always be beyond the 3 color minimum for tournaments, and will include the little details that we all want. I will paint an army for you that I would be proud to play with myself. I will do custom color schemes, as well as traditional "from the book" schemes. I only have one level, and that is fully painted.

About Me

I paint models and have been doing it since I was 12. Over the years I have learned tons of tricks and painted loads of models. I have ran a very successful Miniatures studio, and owned a Retail Game Store. After closing those, I decided to get a little smaller with the operation and I am back to a one man show.

Search This Blog

1/21/18

New to the Hobby Tabletop Game Series - Plastic Model Assembly

Continuing my series for newcomers to the Hobby Tabletop Game series, I am going to show how, with the use of the tools that I have already shown, we can do simple assembly on a plastic model, in this case, a Games Workshop Primaris Space Marine Intercessor Sergeant.


After selecting the parts to assemble, grab the small angle cutters, and locate the part.  Put the flat of the angle cutter against the surface of the part, and carefully clipp it out.


After removing the part, look at the point where it attached to the sprue.  If there was going to be any mold lines, this is where they would run from and run the length of the part.


Take the hobby knife, and angle the blade AWAY from the fingers, scrape away the mold lines.


For any on a wide open area, like the front of the leg greaves, use the emory board or needle file to remove the mold line.


Using the plastic glue, put a small amount on the mating surfaces.  Remember, a little goes a long way.

Repeat until all parts for that model is assembled.  With plastic glue, the model must be set aside for at least a 30 minutes to set up so we can continue working.

For a better understanding of the whole process, from start to finish, please take a look at the video below!


New to the Hobby Tabletop Game Series - Hobby Tools!

Continuing my New to the Hobby Tabletop Game Series, I want to talk about hobby tools.

I used to own an LGS, and would weather the stares from moms and dads as they came into the shop, looking to set their kid up with a starter to Warhammer or any other hobby game.  Much to their dismay, there are a lot of tools that the new gamer needs to be able to get started sticking their little plastic army men together.


Basic Tools


I'll cover the absolute basic tools and their uses, just so the new hobby gamer can understand what they may need, and cover some advanced tools that I also use, to do other fine modelling work.


Shown here are the very most basic of tools, and their uses:
  1. Super glue - Yes, good old super glue.  Used for attaching various modelling materials together like resin plastic (Forge World, Privateer Press, Blood and Skulls Industries), pewter, and other odds bits that a modeller may want to attach to their models (or bases). I have used various brands, but prefer Zap a Gap and Gorilla Glue.  I've tried the GW superglue, and in it's previous incarnation, was awesome.  Not so much with the latest little squeeze packets.
  2. Plastic Glue - This us used to glue together strictly polystyrene plastics.  It has a long cure time, but holds parts in place so that they can be moved for best fits (especially multi piece limbs that take some effort to match up). There are several brands out there designed to be used on polystyrene plastic models. This stuff actually melts the plastics together, forming a permanent bond. I prefer Testors or the GW Plastic Glue.  The GW plastic glue has an amazing metal applicator tip, and it damned accurate.
  3. Fine Needle Files - These are used to remove mold lines, clean up the cut points after a piece has been removed from a sprue, or to de-burr pewter models. I have about 10 different needle files I use to do clean up duties on my models. I don't really have a brand preference, but have this set currently, and I like them.  I have a set of the GF9 ones, and they are pretty nice.  The handles make them even nicer.
  4. Surgical fine point tweezers - I use these to handle small parts and when I assemble decals. I used to work in medical supplies, and got these when the sealed surgical packaging was torn open.  I like the bent point, but these are good as well.
  5. Emory board - I use this for removing mold line on long flat areas.  These are cheap ones I picked up and keep in my tool box for working to clean small electrical connections.  It works great on resin and are easy on the hands.
  6. Fine tip angle cutters - These are used to cut the parts from the sprue.  I have a set of Plato 170 1mm shears, and have used them for year.  Have to be careful, as the points are easy enough to bend.
  7. Hobby knife - This has various uses.  I use mine to shave off mold lines, clean up cut off points, start pilot holes for drilling out gun barrels, and are just a great tool to have around.  Avoid the ones with the snap off blades.  I have a black X-Acto handle I have used for roughly 15 years, and I change the blade every month.
  8. Painting pallet - This is your painting area.  It is used to thin and mix paint, is where a hobby gamer like me spends 85% of their hobbying time.  I use a plain old lime green textured cutting board.  This way, it can double as a modelling surface.  The texture allows the paint to adhere without fully sealing to the board, meaning I can scrape it clean every month.
This is the very minimum that any person building models should have at their disposal.  However, it is not everything. 

Intermediate Tools

 There are times when we need a specialized tool for a particular task, and the one listed above will not cut it.


Okay, so here are some of the tools that, as a hobby gamer starts to do more and more modelling, they will want to add to the tool box.
  1. Fine craft wire and paperclips - This has a variety of uses, but I use if for fine pinning of models.  This is were I use wire to reinforce the bod of two small pieces of a model. I cut these with my Large Angle cutters so the metal does not pit the blades of my fine angle cutters.
  2. Pin vice - This is a small hand powered drill. It's used for drilling holes in models.  This is good for gun barrels, exhausts, etc, but is also used to drill the holes for pinning. I have 2 that I will load up with the two most common sizes of bits I need for a job.  A bit to match each size of the wire. I have 2 of the old GW ones.  GF9s are good, as are the ones from Testors.
  3. Larger Angle Cutters - These are used to cut through larger pieces of plastic, metal, and resin.  They have thicker tangs, and are less likely to break under greater pressure. I have a pair of Plato1755 and love them. 

Advanced Tools

Again, even with the two sets of above tools, there may be jobs that require a bit more of a specialized tool to get the job done.  The hobby knife and angel cutters are only going to get you so far.  In the event that I need to do some precise cutting through thicker materials, I have the below:


  1. The Razor Saw - This is for precision straight cutting of materials, up to and including metal. I use this for fine cutting of plastic parts during conversions.  I use this for straight cuts.  It is an Excel Pull Saw Blade, which has a breadth of cut if less than 1mm.  When I say fine, I mean fine. I used an old X-acto knife handle to set it up.
  2. Jeweler's Coping Saw - This is the bad boy that I use to do larger cuts in even thicker material.  I have used in to cut the massive Forge World ejection port nubs off closer to the model.  It has a twisted blade that cuts in all directions.  Mine is the old GW handle that is not made anymore, but these can be picked up just about anywhere there are craft supplies. The breadth of the cut will depend on the blades installed. I am currently using these in a 1.05mm.
This pretty much covers all the basic tools I use to build models. There are others that are used for airbrushing, terrain making, etc, but I will leave that for another article.  So, there is the equipment list - go get equipped and get to modelling!

Stay tuned for the next article - Plastic Model Assembly basics.


New to the Hobby Tabletop Game Series - Hobby Workspace

Kind of like Capital One - "What's your hobby space look like?"

Mine is a constant mess - partially contained chaos, but for this new series of posts I am doing, I straightened up (okay, not all the way) to show what the method to my madness is, and how I have my hobby space setup.


I'm a lucky guy that has been allowed, for the extent of my adult life, to be granted a permanent home to my painting area.  While it has evolved over the years to incorporate more and more tools, bits and bobs, and generalized clutter to become the spectacle pictured above.  Understand that this is not my full hobby area.  I have a 72 inch desk that includes my airbrush setup, a home built rack for all my paint, a swing arm camera for filming unboxings and hobby tutorials, a couple of finished model shelves, a bookshelf for my gaming books and projects still in box, as well as a couple of massive bits boxes.

I will cover just the basic hobby/painting area, and will move into the other areas as I expand on this series of articles.


Okay so let me explain what is going on here:

  1. This is my HD video camera on a swing arm.  While not technically a part of my hobby area, it's going to be in a few of the pictures I post going forward, so might as well explain what it is before I start.
  2. Clamp lamp running a 100w equivalent daylight white LED bulb
  3. Clamp lamp running a 100w equivalent daylight white LED bulb (a second one)
  4. Swing arm lamp with a 60w equavalent daylight LEB array.
  5. Models in progress shelf.  I switch between projects often, as I might be waiting on something to dry, so can reduce downtime.  I also store whatever washes I am using on the current project
  6. An empty, old school, GW basing material tub.  This is just used for elevation so I can snap a picture of a model in progress with my phone.  It gets decent light coverage from the clamp lamp over it.
  7. Project paint storage.  I store all of the paints I am using in the current project(s) so that I don't have to keep going back to my paint rack to get what I need.
  8. Water rinse pot.  Nothing high tech - just a pickle jar with fresh water.  I change my water often, and do so especially after painting metallics.
  9. This is where I keep my good paint brushes.  I do have a brush caddy, but this works better because I switch styles and sizes often during a painting session.
  10. This is where I keep my hobby tools and junk brushes.  I keep junk brushes around for the unsavory tasks of drybrushing, applying decals, and applying basing materials.  I go through brushes pretty often because I am pretty hard on them.
  11. My painting pallet.  This is a lime green textured cutting board that I have been using for roughly 15 years.  I do all my assembly and painting here, and clean the paint build up off about once a month.  I move all over the lower part, as can be clearly seen.  I don't use a wet pallet, but have tried one and didn't like it.
  12. The whole thing is built around an old school Games Workshop painting station.  I have yet to use the water cup holders or the paint brush holes for anything of real mention.  This thing is sturdy, doesn't move, and has a nice groove to keep the detritus from model building, and the occasional tipped paint pot, from running onto the floor.
Stay tuned for the next article - Basic and Advanced Hobby Tools!


1/20/18

Going to the tournament!

Today, my friend Tom and I went to a tournament run by the good guys over at the Forge World Columbia gaming club and Mageling Games in Columbia, Missouri. For those new to the tabletop community, most games will have some sort of organized gameplay events, and a lot of the FLGSs (Friendly Local Game Store) will run them with some regularity. A couple of weeks ago, I saw an event pop up, and talked Tom and figured we would go push some plastic army men, chuck dice, and make general fools of ourselves, away from the family for a few hours.

Before I get into the Tournament Review, I want to talk about tournaments and a few pointers. After building your list, checking it twice, making sure your models are ready to go (painted, based, have arms and heads), stop a few minutes and do yourself and the Tournament Organizer (TO) a favor - go back and review the restrictions on the tournament.

There's a story coming up in all of this, I promise. I am, in particular, a Warhammer 40k player, so I will talk about 40k events, but the same can be said of most events of this type. Most events will post the rules and expectations of players, well ahead of time. Currently, the favored tournament formats are Independent Tournament Circuit (ITC events), although run by different groups, will use very similar sets of rule.

The most popular being Frontline Gaming's ITC - Responsible for the Nova Open, Las Vegas Open, and Adepticon.  These events, along with others that register for the series, are all linked together, in a huge database of players from all over North America.

Before building your list out, take the time to familiarize yourself with the rules (usually available months in advance) and any army construction restrictions.

And here comes the story.  Tom and I laid out a brilliant 2 x 1k point list Chaos army, using Death Guard and Thousand Sons.


We played a test game against 2 1k lists made up of Ultramarines Primaris Marines, and Space Wolves, and determined that for ease of play, so we didn't drive our opponents crazy not fully knowing or remembering our rules, we would use these two armies instead.

We built out our lists, packed up our (okay, my armies, because I am a paint snob) and headed off to the event.  Everything was going great, chatting with the guys, hanging out, until we went to list turn in. Had I checked the Adepticon and Event post on Facebook more carefully, I would have known this and been able to build our lists to be correct and LEGAL for the event.
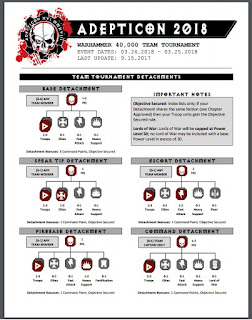

Ben, the TO at the event allowed us to play anyway, and we made sure to inform our opponents. Gratefully, all three sets of our opponents didn't complain about this infraction, and we were allowed to play.  In larger events, we would have been DQd and sent packing.

Our Lists for the event were thus:
Ultramarine Strike Force 997 points
+ HQ +
Primaris Librarian [101pts]
Psychic Scourge, Null Zone, Force sword, The Armour Indomitus
+ Elites +
Primaris Apothecary [68pts]
+ Troops +
Intercessor Squad [162pts]: Bolt rifle
8x Intercessor, Intercessor Sergeant
Intercessor Squad [162pts]: Bolt rifle
8x Intercessor, Intercessor Sergeant
+ Flyer +
Xiphon Interceptor [240pts]: 2x Twin lascannon, Xiphon missile battery
+ Heavy Support +
Hellblaster Squad [16 PL, 264pts]: Plasma incinerator
7x Hellblaster, Hellblaster Sergeant

Space Wolf Strike Force 997
+ HQ +
Rune Priest [6 PL, 105pts]: 3. Jaws of the World Wolf, Bolt pistol, Runic armour, Runic staff
Wolf Lord [5 PL, 84pts]: Bolt pistol, Frost axe
+ Fast Attack +
Fenrisian Wolves [2 PL, 30pts]: 5x Fenrisian Wolf
+ Troops +
Blood Claws [8 PL, 159pts]
8x Blood Claw w/Bolt Pistol, Chainsword
Blood Claw Pack Leader: Bolt Pistol, Power fist
Blood Claw with Special Weapon: Meltagun
Grey Hunters [6 PL, 69pts]
Grey Hunter Pack Leader: Power sword
4x Grey Hunter w/Bolt Pistol, Bolter
+ Dedicated Transport +
Razorback [5 PL, 87pts]: Twin heavy bolter
Grey Hunters [6 PL, 69pts]
Grey Hunter Pack Leader: Power sword
4x Grey Hunter w/Bolt Pistol, Bolter
+ Dedicated Transport +
Razorback [5 PL, 114pts]: Twin assault cannon
+ Flyer +
Stormwolf [14 PL, 279pts]
Twin helfrost cannon
Two Lascannons: 2x Lascannon
Two Twin Heavy Bolters: 2x Twin heavy bolter

We went 0-2, first game was close, second was a solid victory, and third was an all out disaster.

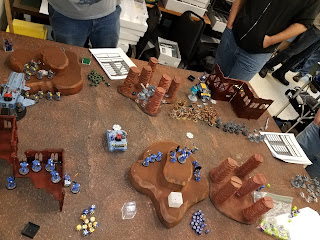
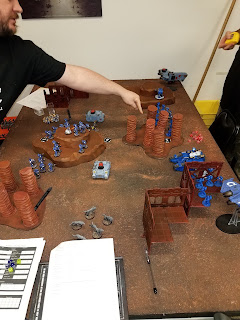
I'll compile all the tournament stuff I collected and post again here in a few days.  But for now, enjoy some pictures:


1/17/18

Painting Goliaths from Necromunda

So, thankfully, I got a bit of time to work up a tutorial on the Goliath models from the new Necromunda boxed game from Games Workshop.


I started off with a coat of black Vallejo polyurethane primer, followed with a coat of GW Mechanicus Standard Battle Grey, shot on the bottom half of the model.


Boots and straps were painted in Vallejo Beasty Brown, and the metallic bits in GW Leadbelcher. I painted the areas that I wanted red in GW Mephiston Red.  The model was then given a thinned wash of GW Nuln Oil.


The flesh was painted with P3 Midland Flesh.  I painted the remaining straps with Vallejo Beasty Brown.


I applied a wash to these areas with GW Agrax Earthshade. Be careful of the wash, to make sure that it doesn't pool. The grey was highlighted with first with GW Mechanicus Standard Battle Grey, and then an edge highlight of GW Eshin Grey, the red with GW Mephiston Red, followed with a fine edge highlight of GW Evil Suns Scarlet.  Metallic areas were re-highlighted with GW Leadbelcher.

Now all that is left is to paint the bases up, paint up some Eschers, and actually get a game in.

Hope you all enjoy!