Commission Painting and Pricing

Yes, I do take commissions.

Infantry are $15 a model, regardless of size, up to 32mm round base.
Large Infantry and Cavalry are $30 a model, up to 50mm round base.
Extra Large Infantry are $45 a model, up to 60mm round base.
Vehicles are based on size:
$150 for 40k dread sized (60mm base)
$200 for 40k Rhino chassis or similar, smaller fliers (Storm Talon)
$400 for 40k Land Raider, larger fliers (Storm Raven).
Forge World and Collossals - prices vary

These prices include all assembly and basing. If you already have models assembled, primed, or want to do the basing yourself, please contact me and we can talk about reducing the price.

What you get for your money - models will be cleaned of any mold lines and flash, assembled, primed, painted, based, and matte varnished for protection. Will always be beyond the 3 color minimum for tournaments, and will include the little details that we all want. I will paint an army for you that I would be proud to play with myself. I will do custom color schemes, as well as traditional "from the book" schemes. I only have one level, and that is fully painted.

About Me

I paint models and have been doing it since I was 12. Over the years I have learned tons of tricks and painted loads of models. I have ran a very successful Miniatures studio, and owned a Retail Game Store. After closing those, I decided to get a little smaller with the operation and I am back to a one man show.

Search This Blog

9/22/16

Death Guard Post #4 - Alternate Color Scheme Tutorial

Well, I didn't get to paint last night.  My butt needed a break from my chair, so I hung out with my family instead.  Anyhoo - As I am painting tonight, I am working up a tutorial for my alternate color scheme for the Grave Wardens.

Here is the Chem Master, Grave Warden Sergeant

Step 1 - Primer and Basecoat
Prime black with Primed Vallejo Polyurethane Acrylic Grey (73.601)
Spray GW Castellan Green Air


Step 2 - Color Blocking
On the shoulders and bone areas, block with GW Rakarth Flesh (base)
Reblock GW Pallid Wyche Flesh (layer)
Edging on greaves and pauldrons GW Balthazar Gold (base)
Skulls GW Mephiston Red (base)


Step 3 - Shading
Mixing 1/4 Lahmian Medium and 3/4 Agrax Earthshade, wash the entire model, making sure that it does not pool heavily in any area.
Once the shade is dry, color block out anything to be painted VGC Beasty Brown and GW LeadBelcher.  Wash those areas with Nuln Oil.


Step 4 - Reblock and highlight
I reblocked all main colors, leaving the recesses darkened.
For highlights on the main armor, I mixed a 50/50 mix of GW Castellan Green and GW Straken Green. On the wide armor plates that would have light hitting them, I painted this mix, leaving the darker Castellan green in the darker areas.  The final highlight was edge highlights of Straken Green.
For the bone/white areas, I edge highlighted with GW Skull White.
Brown areas were re-highlighted with Beasty Brown, and then a quick drybrush of leadbelcher was applied over the washed silver areas.
Over the washed gold, I highlighted with GW Gehenna's Gold.
Finally, the reds were highlighted with GW Evil Sunz Scarlet and a fine highlight of GW Wild Rider Red.
The helmets were painted the same way as the rest of the Bone.  For the eyes, I went with GW Moot green, and applied a light wash of GW Biel Tan Green wash.


I glued in the heads.  If you look carefully, the damage that was molded into the models have been highlighted using the method for painting on armor chips, I made sure to keep the darker colors inside the molded on damage, and paint the highlight below the damage.

So far, I am really happy with the way that this legion is looking!


9/21/16

Death Guard Legion, Post 3

Well, last night I painted up my sample model for the first of 2 Grave Warden units.

I have been enamored with this unit since I first decided to do a Death Guard Legion.

So a little breakdown on the unit.  A Grave Warden Terminator Squad is a Heavy Support Choice in a Death Guard Legion list.

These guys come stock with Cataphractii Terminator Armour, Assault Grenade launcher, Power fist and Death Cloud. You can add chain fists, 1 heavy flamer per 5 models, and the sergeant has access to combi weapons.

Being a Heavy Support Choice doesn't hurt, as they can take a Land Raider or a Spartan as a transport option, making it a double tap on Heavy Options, although either choice is expensive (cost and points)

The assault grenade launcher is an interesting concept.  I like the krak option since its a STR 6 AP 4 Assault 2. The other round option is Toxin grenades, Toughness test, AP4 with no cover saves.  Lots of close ranged hurt sauce going out. Good against mass, light armored troops, but not great against T4 Power Armored Marines.

Now Death Cloud is where this unit gets their interesting rules.  This unit now can become a sort of counter charge unit since a unit that charges them will not get their +1 attack on the charge and they count as charging across dangerous terrain.  Has the same rules as the toxin grenades above.

So, battle plan is to Krak grenade anthing that moves, and use them as a charge defense, with Toxin and overwatch.

Fluff wise these guys nail what I think the Death Guard are about.

Onto the sample model.  Unfortunately, every picture white washed out the models helmet, but in real life, this model has it going on.


Tonight, as I am working on his 4 squadmates, I will work up a tutorial to post tomorrow.

9/20/16

Death Guard Legion, Part 2 - Continued

And here the Contemptor is - all painted up! I inverted the color scheme to make him stand out, and so I didn't drive myself crazy with the bone/white armor.  There is going to be enough of that to come (another 15 man tactical squad), so I wanted to give myself a break.  I like the contract to the rank and file, and I might do the Grave Wardens this way as well.  They will be the last units painted, so that gives me some time to think about it.


I used some Forgeworld Death Guard waterslide transfers, and put them on with Microset/Microsol. Here is a great tutorial on working with both just water, or with Microset/Microsol.

I painted Crysos with the Support Squad.  Once I got to the final stages with him, I switched over to painting him like a character.


I think I should have done him in the flipped color scheme.  His story is kind of sad - basically, after the Edict of Nikea, when the Emperor banned all use of psychic powers, he was thrown from the Librarius (just starting his training) to the Destroyer squads as a Lieutenant, basically sent to die on any nasty mission that Mortarion saw fit to send him on.  He excelled at these and just wouldn't die!

And here's the finished tactical support squad:


I was reading online about the Death Guard fluff - so I guess Mortarion liked the number 7, so it was fortuitous that I only ended up having enough stuff to do 7 of them.  And then I sat and counted up my units for this army:

Crysos Morturg
Legion Tactical Squad 
Legion Support Squad 
Mortis Pattern Contemptor Dreadnought
Death Guard Grave Wardens

Holy cow - I have 7 units.  So I plucked a single marine out of Legion Tactical Squad #1, and will only assemble 13 more.  That gives me 2 units of 14, and 1 unit of 7 Support guys.  The only down side is I don't have the extra stuff to do 4 more grave wardens, otherwise, I would have all units of 7 infantry.

Oh well.  Now for this weeks fun - Grave Wardens.  I need a break from the bone white, so I am putting together a unit of Grave Wardens and going with the flipped color scheme.


Time to throw down some black primer.  Woohoo!

9/18/16

Tabletop Basing Tutorial

Still working on getting that Death Guard Tactical Support squad and Character painted, but since I was waiting for some paint to dry, figured I would crank out that basing tutorial I promised.

To start, I used 2 spare 40mm bases that I had sitting around, and decided to work in 2 ways on the bases.  The first is a method I have been using for a while, and the other is a new method I wanted to try.


On the left, I used good old Elmers glue to attach some playground sand to the base.  This takes a while to dry, but leaves a nice, natural looking texture.  I use playground sand because it is cheap and plentiful, being as both of my kids are school age.  Besides that, you can pick up a 50 lb bag at Home Depot for like $4 - compare that to Citadel Sand for $12.  Sure the Citadel stuff is really fine, but to be honest, I prefer to have bigger chunks in my basing material.

On the right, I tried something a bit new.  I took some brown paint, from the old GW Scenery and Table Basing kit, squirted it into a smallish sealable container, and proceeded too mix some of my playground sand into it. I was trying to mimic the GW "Texture" paints.


Yes, looks like poop, but hey, it works.

After letting them dry for about a 1/2 an hour, I went applied a GW Argrax Earthshade wash to each base, again, setting it aside so it would dry (about a 1/2 an hour).

Once dry, I drybrushed GW Zandri Dust, followed by lighter drybrushes of GW Pallid Wyche Flesh, and then finally, GW White Scar.  Finding out that on either base, a full hour is NOT enough drying time for either the original basing or the initial wash.  On both bases, I had little chunks come off while doing light drybrushing.  Not an issue, as I would cover this with static grass later.


After attaching the static grass with white glue, I painted the edges with VGC Beasty Brown - needing 2 coats as I was painting over unprimed edges.


The one on the left is sand, wash, then drybrush, the one on the right is sand/paint mixture, wash, then drybrush. To be honest, I like the one on the right better - the paint mix gives a better area for the wash too hold onto, and throws more depth into the colors.  And to be honest, a lot of my armies are based the other way.  I won't rebase them, but moving forward, I will be using the new method.

No, all your base are belong to you - get to it!


9/17/16

Death Guard Legion, Post #2

Well, I finished off the 15 man Tactical Squad, and it looks great!


I am not weathering these at all, as I will already have a dirty legion with the Ultramarines (yeah, I know, go figure).

So squad number two was assembled this morning.  I assembled a 5 man Legion Tactical Support Squad.


If you remember in post #1, I talked about Chem Munitions.

"Chem-Munitions:
Flame weapons taken as part of a Death Guard force may be upgraded to special issue Chem-Munitions for their flame weapons (flamers, hand-flamers, heavy flamers, combi-flamers, or Flamestorm cannon) at no additional cost.

If this upgrade is taken, all eligible weapons in a unit (or on a chosen vehicle) are upgraded, and this should be noted on the army list.

Weapons with the Chem-Munitions gain both the Shred and Gets Hot! special rules.

So that makes this a 5 man unit of walking death - Shred allows a reroll on failed To-Wound rolls. Gets Hot means that the weapon can overheat on a To hit Roll (or special check roll) of a 1.  Flamers ignore cover, and have Wall of Death. Wall of Death is a shooting attack made as a response to getting charged.  Normal shooting weapons hit on a 6, but Wall of Death auto-inflict d3 hits if "a Template weapon fires Overwatch".  This squad represents 5d3 hits if the unit is charged in combat.  A great speedbump unit. I pilfered some of the BaC marines I had for a few extra models in my Deathwatch Army (including a Heresy Era Black Shield) so I will have to settle for 8 marines in this squad.

I also assembled a Mortis Pattern Contemptor Dreadnought.


The Contemptor from Battle of Calth box comes with 2 ranged weapon options, a multimelta, and a kheres patter assault cannon, and then a single left side option of a powerfist.  I assembled the powerfist, and then, using my razor saw, cut the powerfist off, right above the elbow joint.  I then assembled a spare kheres assault cannon I had and did the same.  I glued the kheres to the power fist upper arm. I dug through my bits box, looking for something to use as a havoc launcher, and found an old Chaos Space Marine vehicle havoc launcher.  After a bit of fiddling with it, I thought it looked good, and attached it.  Probably should have popped a magnet into each of them, but hindsight, 20/20, you know how it goes.

In game terms, lots of firepower here with overlapping ranges that is capable of being a threat to lighter tanks, aircraft, and infantry in general that are not terminators. But even terminators will lose a few wounds in all probability due to the sheer rate of fire this Contemptor is able to pump out. Little not to like here!

Last conversion item of the day will be Section Leader Crysos Mortug.


He's a Centurion level character that is also a L1 psyker.  Seems to be a pretty tough customer, and it was pretty fun to hack up that BaC Chaplain to make him.  I swapped on a combi-flamer and powersword, and cut off his headcrest.  In his fluff, he was sent to Istvaan because he was an undesirable, so he fits with the list I have put together so far.

If I can get both of these units and the character painted today, I will be at roughly 765 points painted, with a planned 1500 point list.

The Ultramarines have grown out of control, so I have to get that list all figured out, once I have the Deathguard all done up.

9/11/16

Death Guard Legion, Post #1

Wow - has it really been this long since I have done a blog post?  I guess life has a funny way of keeping you busy.

So in the midst of everything, I am still painting, and have been doing a lot of it.

Today, I am going to be putting together a Warhammer 30k Pre-Heresy Death Guard painting Tutorial, as well as some thoughts on why I am building the units the way that I am.

To start, I assembled a 15 man Tactical squad.  Death Guard, as well as 30k as a whole, favor large infantry units.  This allows them to use the "Fury of the Legion" which is a bolter drill type ability that allows the squad to pour fire into a target.

Fury of the Legion: What is better than rapid firing with 15 bolters? Rapid firing with 15 bolters, TWICE! This special rule lets you shoot with bolters and bolt pistols twice if you did not move, deep strike, or disembark from a transport that turn. You can pour up to 60 shots from a 15 man squad! The only downside is you can not charge the same turn or shoot the next turn.

I plan to build a 30k legion around 2 of these units.  Get them dug in on an objective, and then dakka the crap out of any unit that gets close to it.  Standard tactical squads in 30k do not get access to special or heavy weapons, so to give a nasty surprise to any charging units, or heavier infantry units, I threw a combi-plasma on the Sergeant.  Now, being Death Guard, I should have popped a combi-flamer on this guy, instead.  For Death Guard, flamers can be equipped with Chem-munitions.

Chem-Munitions:
Flame weapons taken as part of a Death Guard force may be upgraded to special issue Chem-Munitions for their flame weapons (flamers, hand-flamers, heavy flamers, , combi-flamers of Flamestorm cannon) at no additional cost.

If this upgrade is taken, all eligible weapons in a unit (or on a chosen vehicle) are upgraded, and this should be noted on the army list.

Weapons with the Chem-Munitions gain both the Shred and Gets Hot! special rules.


Now, with that out of the way, let's get on with the tutorial.


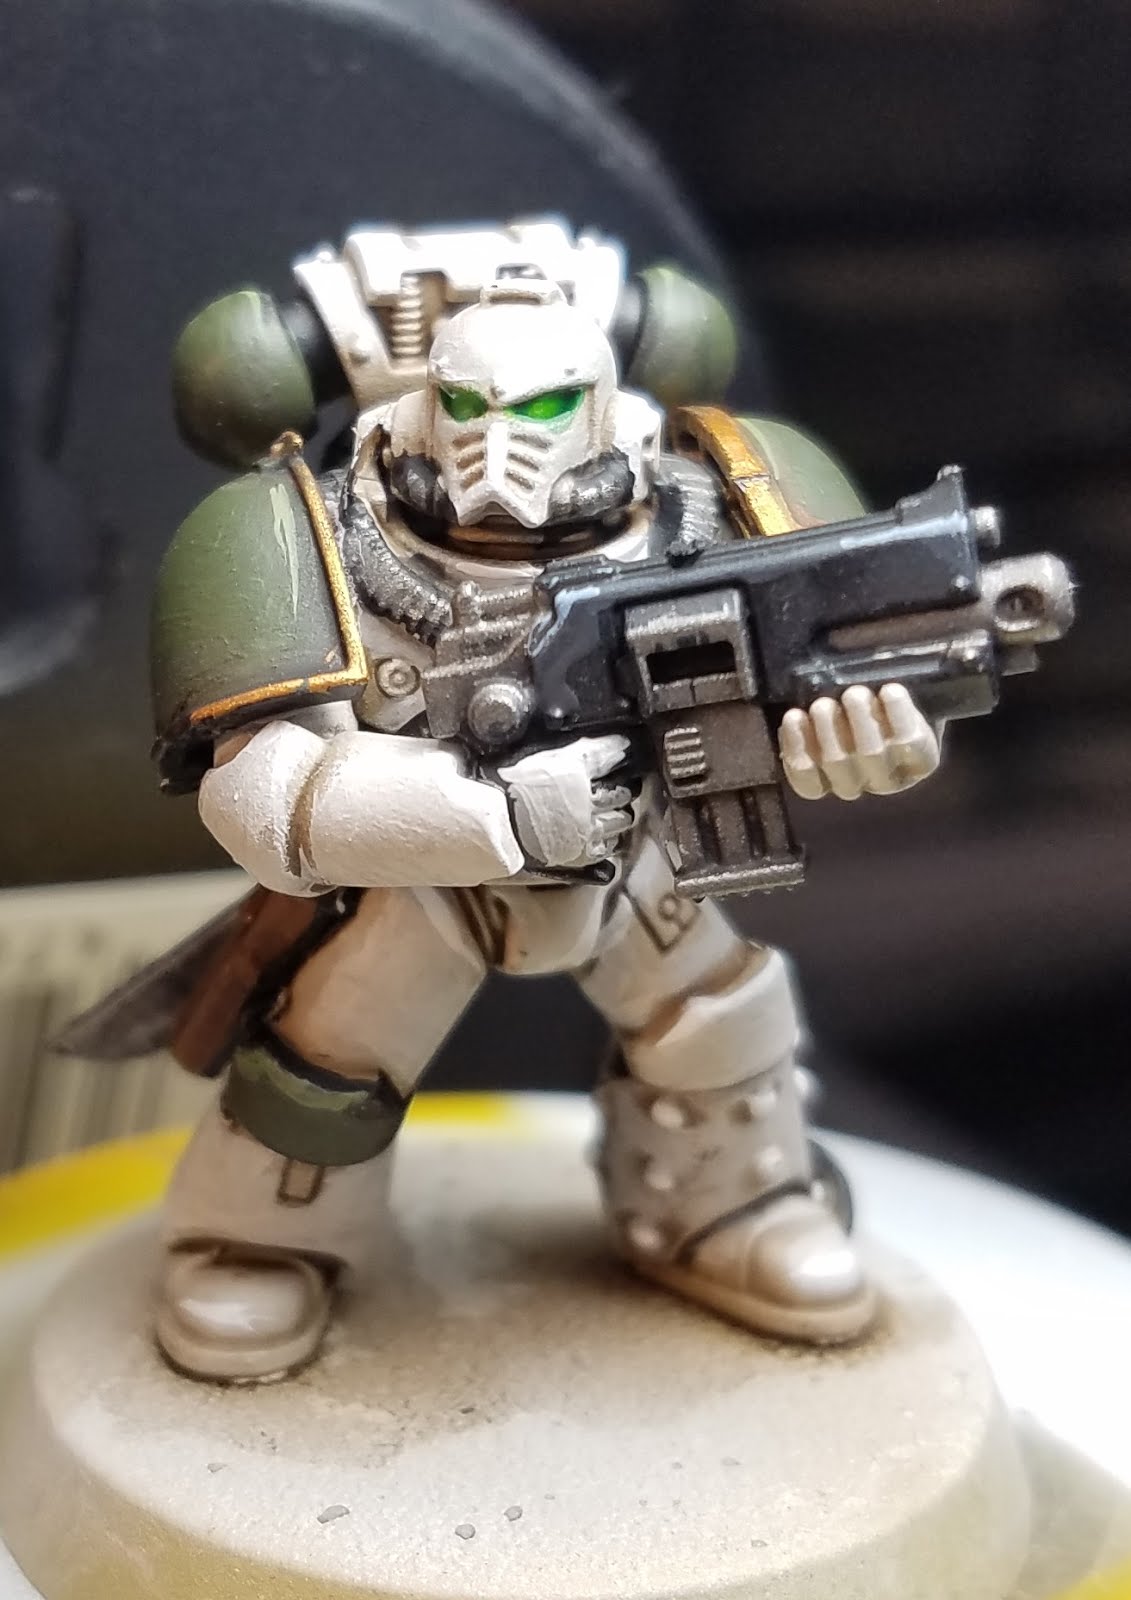
Here is the final goal of what I am going for:


During assembly, I left off the shoulder pads and bolters to allow for ease of painting, as well as allowing me to prime them in black.

Main Bodies:

Primed Vallejo Polyurethane Acrylic Grey (73.601)
Base Coat GW Zendri Dust Air
Layer Coat GW Pallid Wyche Flesh (I thought I had the Air version, but didn't.  I mixed this down about 50% paint and 50% Vallejo Airbrush Flow Improver 71.462. This provided a great mixture and it flowed through my airbrush really well).

Now, why the base and layer steps? The GW paints are made to work this way, and the undercoat will greatly affect the overall color of the model.  By basing Zendri Dust, and then layering Pallid Wyche Flesh, I am able to get a warmer color with the Wyche Flesh.


After this has fully dried, I mixed a 50/50 mix of GW Agrax Earthshade and Lahmian Medium to thin the wash, but by using the Lahmian Medium instead of water, I was able to preserve the qualities of the wash to gather in the cracks, for a light shade. This was done instead of Pin Washing, as I wanted to mottle the armor a bit.  This is a way to kind of weather the armor without having to paint it to a pristine level.  I will be doing no other weathering on the armor, and this gives a worn look.


Now I let this dry, and move onto the next step - retouching the Pallid Wyche Flesh, and then edge highlighting with GW White Scar.  Once that is done, Using GW Abaddon Black, I repainted all areas that were to have darker colors and metallics applied, plus the joint areas, which will stay black.


I applied GW Leadbelcher to the chest piping and other bits, Vallejo Game Color Beasty Brown to leather pouches, and GW Castellan green to the vent pods and a kneepad.  The Leadbelcher areas were given a wash of Nuln Oil, and the Beasty Brown and Castellan green were given a wash of Agrax Earthshade.


Castellan Green was reapplied to the green areas as a wide area highlight, followed up with an edge highlight of Straken Green.


Shoulder Pads

The shoulder pads were primed with Vallejo Black Polyurethane Acrylic Primer (73.602), and then shot with GW Castellan Green Air.

I painted the edges with Gehenna's Gold, and then applied a wash of Agrax Earthshade to the whole pad.

These will be highlighted once on the model.

Final Assembly and Details

The last steps include putting the shoulder pads on, and then doing the pad highlights.  The washed Castellan Green is reblocked with Castellan, and then a highlight of Straken Green.  The Gehenna's Gold is edge Highlighted with Gehenna's gold. The hands on the boltgun were painted just like the main body armor. Hihglights to the black on the boltgun case were done with GW Eshin Grey, and final edge highlight of GW Fenrisian Grey. I painted the eye lenses with GW Moot Green, and then applied a wash of GW BielTan Green.


Finished 5 model block!


Tomorrow, I will setup the bases, and post a tutorial for that as well!  Hope everyone enjoyed this tutorial!