Commission Painting and Pricing

Yes, I do take commissions.

Infantry are $15 a model, regardless of size, up to 32mm round base.
Large Infantry and Cavalry are $30 a model, up to 50mm round base.
Extra Large Infantry are $45 a model, up to 60mm round base.
Vehicles are based on size:
$150 for 40k dread sized (60mm base)
$200 for 40k Rhino chassis or similar, smaller fliers (Storm Talon)
$400 for 40k Land Raider, larger fliers (Storm Raven).
Forge World and Collossals - prices vary

These prices include all assembly and basing. If you already have models assembled, primed, or want to do the basing yourself, please contact me and we can talk about reducing the price.

What you get for your money - models will be cleaned of any mold lines and flash, assembled, primed, painted, based, and matte varnished for protection. Will always be beyond the 3 color minimum for tournaments, and will include the little details that we all want. I will paint an army for you that I would be proud to play with myself. I will do custom color schemes, as well as traditional "from the book" schemes. I only have one level, and that is fully painted.

About Me

I paint models and have been doing it since I was 12. Over the years I have learned tons of tricks and painted loads of models. I have ran a very successful Miniatures studio, and owned a Retail Game Store. After closing those, I decided to get a little smaller with the operation and I am back to a one man show.

Search This Blog

9/29/17

Blood and Skulls Industries Sagittarius Kit - Wrap that Land Raider in tracky goodness!

Rejoice modellers!  Well, okay, I know I did today when I opened my mailbox and found my package from Blood and Skulls Industries.  I am working on an Ultramarine army for contract, and needed a couple of twin assault cannon turrets for some Razorbacks.

I did an unboxing and assembly video on those here.

Further, tucked away in said shipping container was one of Blood and Skulls brandy new Sagittarius Conversion Kits, with Oppressor tracks.

For this, I shot an unboxing video, as well as shot an assembly video for a single side.

I wanted to get a step by step assembly article written on these as well, so people would can have a visual reference when assembling.

Okay, a bit about this kit.  It is a collaboration between Tom, the owner of Blood and Skulls, and a guy named Maarten.  Maarten (that is the Dutch spelling) designed the kit in CAD, and Tom went to work making the parts and casting the kits. It works and can be selected with all three versions of the 080 tracks - Oppressor, Liberator, and Krusher. According to Blood and Skulls, the Liberator is his most popular Sagitarius Kit, with almost 40 sold since it's release at the middle of last month. This kit is HOT HOT HOT!


Putting It Together


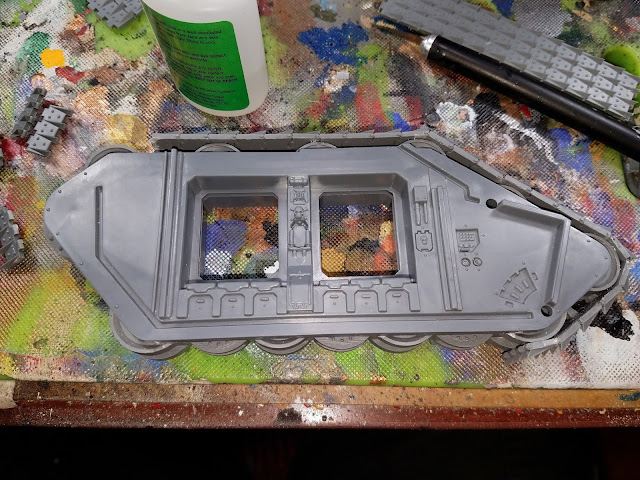
I started off, working on the other half of the Land Raider kit.  It is easier to assembly the sides with tracks first, and then do the final assembly.  Less to handle, and with the Oppressor tracks, less chances of poking your fingers. There are some other assembly tutorials out there that say to attach the guide wheel assemblies first, then assemble the hull halves, but I did not find this to be a problem. 


This is the guide wheel assembly pic from the eBay listing.  I did not glue them all together, but instead, did a dry fit and glue in place directly to the hull. The kit has separate parts for each side, so a dry fit before glue is a MUST.


The tolerances on the kit are also pretty tight as well.  When doing the final assembly, I had to make sure to press down hard to get the piece to "Click" into place.


I used the track assembly guide from the kit to put the tracks on, once the guide wheels were dry.


I started with the top and front sections, and worked my way around to the rear of the hull.


I had 0 fitment issues on this side, but the first side, I had to do some mad filing on the joint in the back.  I think, however that is my fault (in a rush to assemble the kit) than any fault in the kit.  Had I taken the extra couple of minutes to file the track starts and ends like I did for this side, it would not have been an issue.

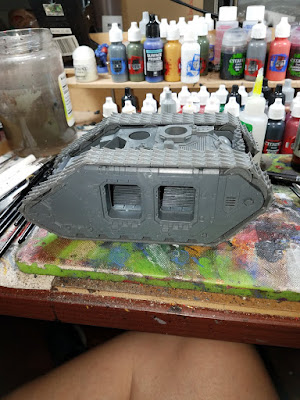


So, as you can see, this kit made the boring, ho hum Land Raider into a crushy, bladey, vehicle of death.  And, as with all of Blood and Skulls track kits, there were extra links left over, and so I stuck them to the front of the assault ramp because Chaos, that's why.


I really enjoyed this kit.  Inn a conversation with Tom, he stated that he was concerned about clearance issues with the assault ramp opening assembly.  I normally glue my Land Raiders shut, so this wasn't an issue, but when I get the Krusher kit in for the Death Guard Land Raider, I will test that out for him.

The last thing, before assembling the tank is the rear section. No need to cut down the top plate from the LR, although you could if you wanted.  This piece fits better than the GW front Hull section, isn't warped like Forge World resin, and goes on fast and easy.  Just remember, if you are assembling the side hulls before the main body - DON't FORGET THIS PIECE.  I did, and thank the paint gods I used plastic glue on the plastic parts, otherwise, this thing would have been a drop top!

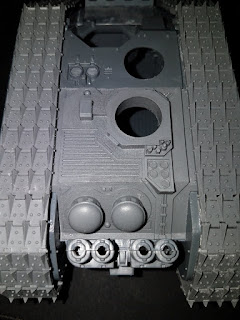
  

Now to convince Blood and Skulls to do some armor banding and some Chaosy bits to adorn this bad boy.  The Thousand Sons have a new ride, and need it suitably detailed before crawling into it.


Hope everyone enjoys!

9/15/17

Modelling Review - Blood and Skull Rhino Tracks

I am continuing with my series of articles on the Blood and Skulls Industries products I pick up.  This time, I went with a set of Liberator Pattern 040 Tank Treads for a Rhino APC for my wife's Thousand Sons army. I used the Rhino chassis from a Baal predator I have laying around (blasphemy) as of the cool front plate being a single vision slit.

You can check out my video review of the tracks themselves here.


I started off with a single side assembled on the Rhino.  The tracks are NOT omnidirectional, there is a side for left and right.  I figured out what side to use and started dry fitting the parts to get the best alignment.  The Rhino kit has a couple of locator pins, so it took a few minutes and some blue tack to lay them all out.


And here is what I got from it. In the image, I numbered the tracks as I put them on.  I know that it seems strange to end a track between the road wheels, but it was the best layout to provide with a little wiggle room to get the spacing correct.


I started with the 8 link section first, running from the back of the first road wheel, across two and ending right before the fourth. Glued to the 8 link section and to the rearward roadwheels.


 I attached a 4 link section. at either end, I added a single link, and then the slope up got a set of 3 links on either side. Single tracks go around the outside road wheel, and then into the body.


On the second link on both front and back, I had to shave an 1/8th of an inch off to get them to sit flat. This picture is from the dry fit, so the tracks were still misaligned.


Here's the front and rear mockup.


And the whole side assembled.


And the finished model.  Now it goes on my shelf to await a time for when I go and paint it!


Get Duncan in your POCKET!!!! The New Citadel Paint App Review

The benevolent souls at GW HQ decided to bless those of us with a painting problem with a great new tool for figuring out what color paints to slather out little plastic army men with.

Behold......The Citadel Paint App!

The app was to be released, both on iOS and Android on Saturday the 15th, but today, to all of our amazement, it dropped early.

I searched for it, and after some scrolling down......FOUND IT!


It installed and I popped it open to check out all the warhammery goodness. Upon opening it, we are greeted with a screen that takes us to the various parts of the app.  Unfortunately, there isn't a way to shut off the little tutorial that wants to tell you what to do (YOU AIN'T THE BOSS OF ME!).


Under Get Started, you will find a selection of different headers that talk about what all you can do with paint, various GW style written tutorials and (WAIT FOR IT..............) videos starring everyone's favorite Painting Overlord - Duncan Rhodes. 


ALL HAIL THE PAINTING OVERLORD!  
TWO THIN COATS FOR THE OVERLORD!!!!!!


Under Paint By Color, you can select a main color (in this example I picked grey), it gives you a choice of different shades of the colors.


The list will give base, shade, layers, and drybrush colors to get to that final color.


Under Paint by Miniature, you can select from a TON of models.  These are not broken out by range, so you just have to scroll through until you want to find the one you want.


Once selected, the image links back to the paint by color section to show you all you need to get the same effects.

Now for the part that we are all wanting to see - the paint matcher. 


Back on the Paint By Color screen, there is a little camera icon in the upper right corner.  Tap that (I did) and it takes you to the view through your camera.  


Line up the object that is subject of your color want.   Try to get it really close to where you are going to tap.  And then tap it a few times until the bar at the bottom closely matches your object.

I did test this out on smaller objects and really bright lights - it is not all that accurate.  It could be improved with a targeting reticle.  However, after a bit of trial and error, I got the below options for my soda bottle top.


No I can go out and paint a bunch of Coca Cola Marines!

The very last part that I want to talk about is the Inventory. In this, you can select the colors you have, and then update it as you run out, so when you hit your FLGS to do your random (or for me monthly) restock, you don't forget any!

All in all, it's a pretty fun app.  Great if you see a model on the GW website and what to know what colors to use, or have models painted in a different manufacturers paint and you want to match with GWs line.  For the new painter, it has a lot of great features - the tutorials are solid, and having the steps right there assists most new painters with not getting lost on a project.

For the old guys like me, it's great because we can see what the color is that we need to replace that old one not made any more.  The tutorials are good for retouching skills we may not have used, and has some advanced techniques we should all learn.