Commission Painting and Pricing

Yes, I do take commissions.

Infantry are $15 a model, regardless of size, up to 32mm round base.
Large Infantry and Cavalry are $30 a model, up to 50mm round base.
Extra Large Infantry are $45 a model, up to 60mm round base.
Vehicles are based on size:
$150 for 40k dread sized (60mm base)
$200 for 40k Rhino chassis or similar, smaller fliers (Storm Talon)
$400 for 40k Land Raider, larger fliers (Storm Raven).
Forge World and Collossals - prices vary

These prices include all assembly and basing. If you already have models assembled, primed, or want to do the basing yourself, please contact me and we can talk about reducing the price.

What you get for your money - models will be cleaned of any mold lines and flash, assembled, primed, painted, based, and matte varnished for protection. Will always be beyond the 3 color minimum for tournaments, and will include the little details that we all want. I will paint an army for you that I would be proud to play with myself. I will do custom color schemes, as well as traditional "from the book" schemes. I only have one level, and that is fully painted.

About Me

I paint models and have been doing it since I was 12. Over the years I have learned tons of tricks and painted loads of models. I have ran a very successful Miniatures studio, and owned a Retail Game Store. After closing those, I decided to get a little smaller with the operation and I am back to a one man show.

Search This Blog

1/21/18

New to the Hobby Tabletop Game Series - Plastic Model Assembly

Continuing my series for newcomers to the Hobby Tabletop Game series, I am going to show how, with the use of the tools that I have already shown, we can do simple assembly on a plastic model, in this case, a Games Workshop Primaris Space Marine Intercessor Sergeant.


After selecting the parts to assemble, grab the small angle cutters, and locate the part.  Put the flat of the angle cutter against the surface of the part, and carefully clipp it out.


After removing the part, look at the point where it attached to the sprue.  If there was going to be any mold lines, this is where they would run from and run the length of the part.


Take the hobby knife, and angle the blade AWAY from the fingers, scrape away the mold lines.


For any on a wide open area, like the front of the leg greaves, use the emory board or needle file to remove the mold line.


Using the plastic glue, put a small amount on the mating surfaces.  Remember, a little goes a long way.

Repeat until all parts for that model is assembled.  With plastic glue, the model must be set aside for at least a 30 minutes to set up so we can continue working.

For a better understanding of the whole process, from start to finish, please take a look at the video below!


New to the Hobby Tabletop Game Series - Hobby Tools!

Continuing my New to the Hobby Tabletop Game Series, I want to talk about hobby tools.

I used to own an LGS, and would weather the stares from moms and dads as they came into the shop, looking to set their kid up with a starter to Warhammer or any other hobby game.  Much to their dismay, there are a lot of tools that the new gamer needs to be able to get started sticking their little plastic army men together.


Basic Tools


I'll cover the absolute basic tools and their uses, just so the new hobby gamer can understand what they may need, and cover some advanced tools that I also use, to do other fine modelling work.


Shown here are the very most basic of tools, and their uses:
  1. Super glue - Yes, good old super glue.  Used for attaching various modelling materials together like resin plastic (Forge World, Privateer Press, Blood and Skulls Industries), pewter, and other odds bits that a modeller may want to attach to their models (or bases). I have used various brands, but prefer Zap a Gap and Gorilla Glue.  I've tried the GW superglue, and in it's previous incarnation, was awesome.  Not so much with the latest little squeeze packets.
  2. Plastic Glue - This us used to glue together strictly polystyrene plastics.  It has a long cure time, but holds parts in place so that they can be moved for best fits (especially multi piece limbs that take some effort to match up). There are several brands out there designed to be used on polystyrene plastic models. This stuff actually melts the plastics together, forming a permanent bond. I prefer Testors or the GW Plastic Glue.  The GW plastic glue has an amazing metal applicator tip, and it damned accurate.
  3. Fine Needle Files - These are used to remove mold lines, clean up the cut points after a piece has been removed from a sprue, or to de-burr pewter models. I have about 10 different needle files I use to do clean up duties on my models. I don't really have a brand preference, but have this set currently, and I like them.  I have a set of the GF9 ones, and they are pretty nice.  The handles make them even nicer.
  4. Surgical fine point tweezers - I use these to handle small parts and when I assemble decals. I used to work in medical supplies, and got these when the sealed surgical packaging was torn open.  I like the bent point, but these are good as well.
  5. Emory board - I use this for removing mold line on long flat areas.  These are cheap ones I picked up and keep in my tool box for working to clean small electrical connections.  It works great on resin and are easy on the hands.
  6. Fine tip angle cutters - These are used to cut the parts from the sprue.  I have a set of Plato 170 1mm shears, and have used them for year.  Have to be careful, as the points are easy enough to bend.
  7. Hobby knife - This has various uses.  I use mine to shave off mold lines, clean up cut off points, start pilot holes for drilling out gun barrels, and are just a great tool to have around.  Avoid the ones with the snap off blades.  I have a black X-Acto handle I have used for roughly 15 years, and I change the blade every month.
  8. Painting pallet - This is your painting area.  It is used to thin and mix paint, is where a hobby gamer like me spends 85% of their hobbying time.  I use a plain old lime green textured cutting board.  This way, it can double as a modelling surface.  The texture allows the paint to adhere without fully sealing to the board, meaning I can scrape it clean every month.
This is the very minimum that any person building models should have at their disposal.  However, it is not everything. 

Intermediate Tools

 There are times when we need a specialized tool for a particular task, and the one listed above will not cut it.


Okay, so here are some of the tools that, as a hobby gamer starts to do more and more modelling, they will want to add to the tool box.
  1. Fine craft wire and paperclips - This has a variety of uses, but I use if for fine pinning of models.  This is were I use wire to reinforce the bod of two small pieces of a model. I cut these with my Large Angle cutters so the metal does not pit the blades of my fine angle cutters.
  2. Pin vice - This is a small hand powered drill. It's used for drilling holes in models.  This is good for gun barrels, exhausts, etc, but is also used to drill the holes for pinning. I have 2 that I will load up with the two most common sizes of bits I need for a job.  A bit to match each size of the wire. I have 2 of the old GW ones.  GF9s are good, as are the ones from Testors.
  3. Larger Angle Cutters - These are used to cut through larger pieces of plastic, metal, and resin.  They have thicker tangs, and are less likely to break under greater pressure. I have a pair of Plato1755 and love them. 

Advanced Tools

Again, even with the two sets of above tools, there may be jobs that require a bit more of a specialized tool to get the job done.  The hobby knife and angel cutters are only going to get you so far.  In the event that I need to do some precise cutting through thicker materials, I have the below:


  1. The Razor Saw - This is for precision straight cutting of materials, up to and including metal. I use this for fine cutting of plastic parts during conversions.  I use this for straight cuts.  It is an Excel Pull Saw Blade, which has a breadth of cut if less than 1mm.  When I say fine, I mean fine. I used an old X-acto knife handle to set it up.
  2. Jeweler's Coping Saw - This is the bad boy that I use to do larger cuts in even thicker material.  I have used in to cut the massive Forge World ejection port nubs off closer to the model.  It has a twisted blade that cuts in all directions.  Mine is the old GW handle that is not made anymore, but these can be picked up just about anywhere there are craft supplies. The breadth of the cut will depend on the blades installed. I am currently using these in a 1.05mm.
This pretty much covers all the basic tools I use to build models. There are others that are used for airbrushing, terrain making, etc, but I will leave that for another article.  So, there is the equipment list - go get equipped and get to modelling!

Stay tuned for the next article - Plastic Model Assembly basics.


New to the Hobby Tabletop Game Series - Hobby Workspace

Kind of like Capital One - "What's your hobby space look like?"

Mine is a constant mess - partially contained chaos, but for this new series of posts I am doing, I straightened up (okay, not all the way) to show what the method to my madness is, and how I have my hobby space setup.


I'm a lucky guy that has been allowed, for the extent of my adult life, to be granted a permanent home to my painting area.  While it has evolved over the years to incorporate more and more tools, bits and bobs, and generalized clutter to become the spectacle pictured above.  Understand that this is not my full hobby area.  I have a 72 inch desk that includes my airbrush setup, a home built rack for all my paint, a swing arm camera for filming unboxings and hobby tutorials, a couple of finished model shelves, a bookshelf for my gaming books and projects still in box, as well as a couple of massive bits boxes.

I will cover just the basic hobby/painting area, and will move into the other areas as I expand on this series of articles.


Okay so let me explain what is going on here:

  1. This is my HD video camera on a swing arm.  While not technically a part of my hobby area, it's going to be in a few of the pictures I post going forward, so might as well explain what it is before I start.
  2. Clamp lamp running a 100w equivalent daylight white LED bulb
  3. Clamp lamp running a 100w equivalent daylight white LED bulb (a second one)
  4. Swing arm lamp with a 60w equavalent daylight LEB array.
  5. Models in progress shelf.  I switch between projects often, as I might be waiting on something to dry, so can reduce downtime.  I also store whatever washes I am using on the current project
  6. An empty, old school, GW basing material tub.  This is just used for elevation so I can snap a picture of a model in progress with my phone.  It gets decent light coverage from the clamp lamp over it.
  7. Project paint storage.  I store all of the paints I am using in the current project(s) so that I don't have to keep going back to my paint rack to get what I need.
  8. Water rinse pot.  Nothing high tech - just a pickle jar with fresh water.  I change my water often, and do so especially after painting metallics.
  9. This is where I keep my good paint brushes.  I do have a brush caddy, but this works better because I switch styles and sizes often during a painting session.
  10. This is where I keep my hobby tools and junk brushes.  I keep junk brushes around for the unsavory tasks of drybrushing, applying decals, and applying basing materials.  I go through brushes pretty often because I am pretty hard on them.
  11. My painting pallet.  This is a lime green textured cutting board that I have been using for roughly 15 years.  I do all my assembly and painting here, and clean the paint build up off about once a month.  I move all over the lower part, as can be clearly seen.  I don't use a wet pallet, but have tried one and didn't like it.
  12. The whole thing is built around an old school Games Workshop painting station.  I have yet to use the water cup holders or the paint brush holes for anything of real mention.  This thing is sturdy, doesn't move, and has a nice groove to keep the detritus from model building, and the occasional tipped paint pot, from running onto the floor.
Stay tuned for the next article - Basic and Advanced Hobby Tools!


1/20/18

Going to the tournament!

Today, my friend Tom and I went to a tournament run by the good guys over at the Forge World Columbia gaming club and Mageling Games in Columbia, Missouri. For those new to the tabletop community, most games will have some sort of organized gameplay events, and a lot of the FLGSs (Friendly Local Game Store) will run them with some regularity. A couple of weeks ago, I saw an event pop up, and talked Tom and figured we would go push some plastic army men, chuck dice, and make general fools of ourselves, away from the family for a few hours.

Before I get into the Tournament Review, I want to talk about tournaments and a few pointers. After building your list, checking it twice, making sure your models are ready to go (painted, based, have arms and heads), stop a few minutes and do yourself and the Tournament Organizer (TO) a favor - go back and review the restrictions on the tournament.

There's a story coming up in all of this, I promise. I am, in particular, a Warhammer 40k player, so I will talk about 40k events, but the same can be said of most events of this type. Most events will post the rules and expectations of players, well ahead of time. Currently, the favored tournament formats are Independent Tournament Circuit (ITC events), although run by different groups, will use very similar sets of rule.

The most popular being Frontline Gaming's ITC - Responsible for the Nova Open, Las Vegas Open, and Adepticon.  These events, along with others that register for the series, are all linked together, in a huge database of players from all over North America.

Before building your list out, take the time to familiarize yourself with the rules (usually available months in advance) and any army construction restrictions.

And here comes the story.  Tom and I laid out a brilliant 2 x 1k point list Chaos army, using Death Guard and Thousand Sons.


We played a test game against 2 1k lists made up of Ultramarines Primaris Marines, and Space Wolves, and determined that for ease of play, so we didn't drive our opponents crazy not fully knowing or remembering our rules, we would use these two armies instead.

We built out our lists, packed up our (okay, my armies, because I am a paint snob) and headed off to the event.  Everything was going great, chatting with the guys, hanging out, until we went to list turn in. Had I checked the Adepticon and Event post on Facebook more carefully, I would have known this and been able to build our lists to be correct and LEGAL for the event.


Ben, the TO at the event allowed us to play anyway, and we made sure to inform our opponents. Gratefully, all three sets of our opponents didn't complain about this infraction, and we were allowed to play.  In larger events, we would have been DQd and sent packing.

Our Lists for the event were thus:
Ultramarine Strike Force 997 points
+ HQ +
Primaris Librarian [101pts]
Psychic Scourge, Null Zone, Force sword, The Armour Indomitus
+ Elites +
Primaris Apothecary [68pts]
+ Troops +
Intercessor Squad [162pts]: Bolt rifle
8x Intercessor, Intercessor Sergeant
Intercessor Squad [162pts]: Bolt rifle
8x Intercessor, Intercessor Sergeant
+ Flyer +
Xiphon Interceptor [240pts]: 2x Twin lascannon, Xiphon missile battery
+ Heavy Support +
Hellblaster Squad [16 PL, 264pts]: Plasma incinerator
7x Hellblaster, Hellblaster Sergeant

Space Wolf Strike Force 997
+ HQ +
Rune Priest [6 PL, 105pts]: 3. Jaws of the World Wolf, Bolt pistol, Runic armour, Runic staff
Wolf Lord [5 PL, 84pts]: Bolt pistol, Frost axe
+ Fast Attack +
Fenrisian Wolves [2 PL, 30pts]: 5x Fenrisian Wolf
+ Troops +
Blood Claws [8 PL, 159pts]
8x Blood Claw w/Bolt Pistol, Chainsword
Blood Claw Pack Leader: Bolt Pistol, Power fist
Blood Claw with Special Weapon: Meltagun
Grey Hunters [6 PL, 69pts]
Grey Hunter Pack Leader: Power sword
4x Grey Hunter w/Bolt Pistol, Bolter
+ Dedicated Transport +
Razorback [5 PL, 87pts]: Twin heavy bolter
Grey Hunters [6 PL, 69pts]
Grey Hunter Pack Leader: Power sword
4x Grey Hunter w/Bolt Pistol, Bolter
+ Dedicated Transport +
Razorback [5 PL, 114pts]: Twin assault cannon
+ Flyer +
Stormwolf [14 PL, 279pts]
Twin helfrost cannon
Two Lascannons: 2x Lascannon
Two Twin Heavy Bolters: 2x Twin heavy bolter

We went 0-2, first game was close, second was a solid victory, and third was an all out disaster.

I'll compile all the tournament stuff I collected and post again here in a few days.  But for now, enjoy some pictures:


1/17/18

Painting Goliaths from Necromunda

So, thankfully, I got a bit of time to work up a tutorial on the Goliath models from the new Necromunda boxed game from Games Workshop.


I started off with a coat of black Vallejo polyurethane primer, followed with a coat of GW Mechanicus Standard Battle Grey, shot on the bottom half of the model.


Boots and straps were painted in Vallejo Beasty Brown, and the metallic bits in GW Leadbelcher. I painted the areas that I wanted red in GW Mephiston Red.  The model was then given a thinned wash of GW Nuln Oil.


The flesh was painted with P3 Midland Flesh.  I painted the remaining straps with Vallejo Beasty Brown.


I applied a wash to these areas with GW Agrax Earthshade. Be careful of the wash, to make sure that it doesn't pool. The grey was highlighted with first with GW Mechanicus Standard Battle Grey, and then an edge highlight of GW Eshin Grey, the red with GW Mephiston Red, followed with a fine edge highlight of GW Evil Suns Scarlet.  Metallic areas were re-highlighted with GW Leadbelcher.

Now all that is left is to paint the bases up, paint up some Eschers, and actually get a game in.

Hope you all enjoy!

11/5/17

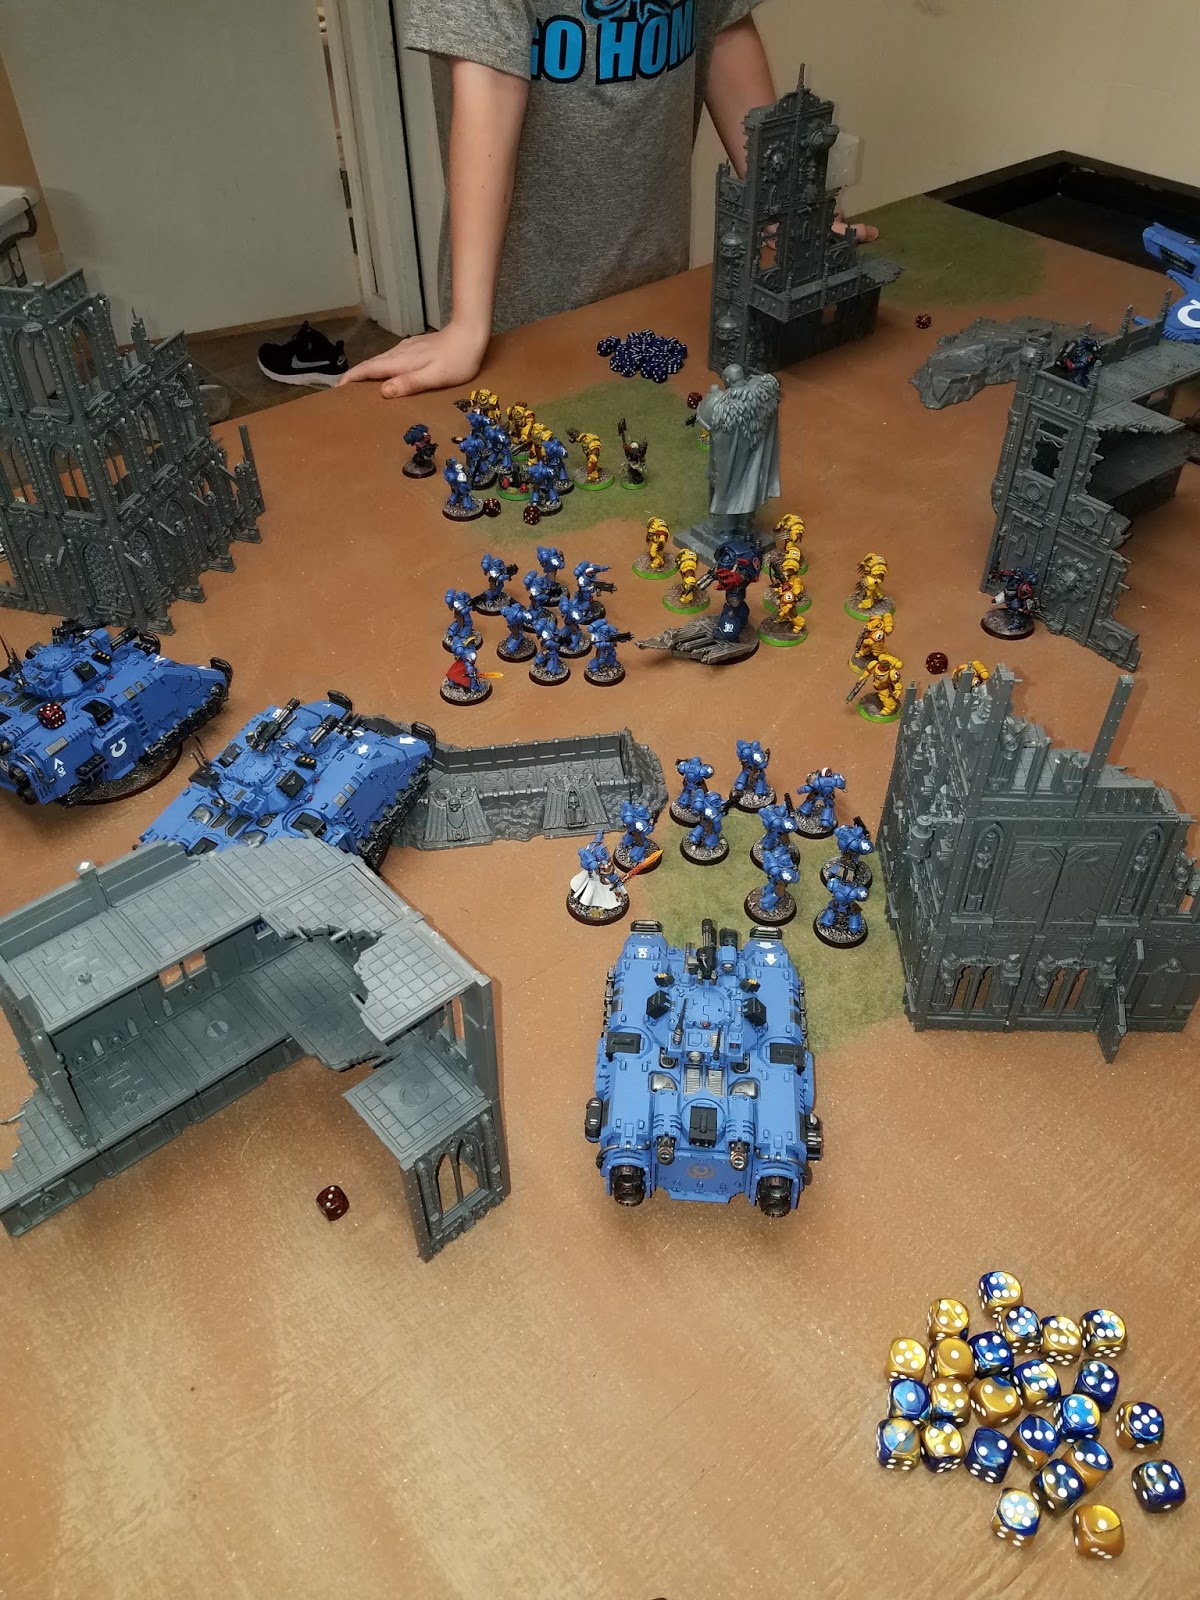
Father/Son battle report - Ultramarines versus Crimson/Imperial Fists - 2k points.

So the son and I decided to throw down a larger game (well for him at least) today.  2000 point lists, played on our table in the basement, with lists built by us.  I decided to just use my 2k point Ultramarine Primaris Force, and he wanted to get a chance to play with some new units I just painted up for him - namely, a 10 man Assault Squad, some Cataphractii Terminators, and a Contemptor dread.  He picked out the units that he used, with the only caveat being that they were fully painted/based.

The Armies:
Ultramarines Primarus Reinforcement Force 1993pts
Patrol Detachment
HQ
Primaris Librarian (Warlord) [105pts]
Psychic Scourge, Fury of the Ancients, Force sword
Primaris Lieutenant [74pts]
Master-crafted auto bolt rifle, The Burning Blade

Troops
Intercessor Squad [180pts]
Bolt rifle, 8x Intercessor, Intercessor Sergeant
Repulsor [326pts]
2x Storm Bolters, Auto Launchers, Heavy Onslaught Gatling Cannon, 2x Krakstrom Grenade Launcher, Onslaught Gatling Cannon, Storm bolter, Twin lascannon
Intercessor Squad [180pts]
Bolt rifle, 8x Intercessor, Intercessor Sergeant
Repulsor [326pts]
2x Storm Bolters, Auto Launchers, Heavy Onslaught Gatling Cannon, 2x Krakstrom Grenade Launcher, Onslaught Gatling Cannon, Storm bolter, Twin lascannon
Elites
Primaris Apothecary [68pts]

Heavy Support
Hellblaster Squad [231pts]
Plasma incinerator
6x Hellblaster, Hellblaster Sergeant
Repulsor [293pts]
2x Storm Bolters, Auto Launchers, Heavy Onslaught Gatling Cannon, 2x Krakstrom Grenade Launcher, Onslaught Gatling Cannon, Storm bolter, Twin heavy bolter

Flyer
Xiphon Interceptor [210pts]
2x Twin lascannon, Xiphon missile battery

Task Force Fists (Imperial/Crimson Fists) 1997pts
Battalion Detachment +3CP
HQ
Captain in Gravis Armor [137pts]
Boltstorm gauntlet, Master-crafted power sword, The Burning Blade
Chaplain [72pts]
Bolt pistol
Primaris Lieutenant [74pts]
Master-crafted auto bolt rifle

Troops
Intercessor Squad [100pts]
Bolt rifle, 4x Intercessor, Intercessor Sergeant
Tactical Squad [187pts]
7x Space Marine
Space Marine Sergeant, Bolt pistol, Combi-grav
Space Marine w/Heavy Weapon Missile launcher
Space Marine w/Special Weapon Grav-gun
Razorback [100pts]
Twin assault cannon
Tactical Squad [191pts]
7x Space Marine
Space Marine Sergeant, Bolt pistol, Combi-melta
Space Marine w/Heavy Weapon, Missile launcher
Space Marine w/Special Weapon, Meltagun

Elites
Cataphractii Terminator Squad [210pts]
Cataphractii Sergeant, Lightning Claw (Pair)
4 x Cataphractii Terminator Lightning Claw (Pair)
Cataphractii Terminator Squad [227pts]
Cataphractii Sergeant, Combi-bolter, Power sword
3 x Cataphractii Terminator, Combi-bolter, Power fist
Cataphractii Terminator w/Heavy flamer, Power fist
Contemptor Dreadnought [167pts]
Combi-bolter, Dreadnought combat weapon, Multi-melta

Fast Attack
Assault Squad with Jump Packs [218pts]
4x Space Marine
Space Marine Sergeant, Bolt pistol, Combat shield, Power fist
2 x Space Marine w/Eviscerator
2 x Space Marine w/Plasma Pistol & Chainsword

Flyer
Stormraven Gunship [314pts]
Twin lascannon, Two Stormstrike Missile Launchers, Typhoon missile launcher

Dedicated Transport
Razorback [5 PL, 100pts]
Twin assault cannon

The Game/Deployment:


We deployed the 6 objective markers and then rolled to determine deployment zone.  Gerrit won the roll for choice and chose Player B deployment. He chose to keep his 2 Cataphractii units and Assault marines in reserve, and deployed one tactical squad and the Contemptor in the Stormraven.  He combat squaded his other Tactical Squad, deploying the missile launcher and 4 marines, along with the Gravis Captain in one tower, and the sergeant, meltagunner, 3 marines and the Chaplain in the Razorback. His Intercessor squad and Primaris Lieutenant deployed way forward in the deployment zone.  Most units were poised to jump on objectives, to attempt to discover the cache quickly.

I deployed to the front of my zone with all three Repulsors, embarking all squads and characters.  The Apothecary rode with the Hellblasters, and the Lieutenant and Librarian rode with Intercessor squads.

We determine that his Battalion granted him 6 CP, and I explained how these worked.  My Patrol detachment netted me 3, so I would be saving those for critical re-rolls. I won the roll for first turn, and we started our game.


Turn 1


Top of my turn, I barged all three Repulsors forward and zipped the Xiphon forward to attempt to deal with the StormRaven.  I was able to get a combined 4 wounds on the StormRaven with the combined twin 8 lascannon shots from the Repulsors and Xiphon, as well as the Xiphon missile battery.  With the weight of fire of Onslaught/Heavy Onslaught cannons from all one Repulsor, I reduced the combat squaded tactical squad to just the missile launcher marine. The combined weight of 2 Repulsors worth of Onslaught/Heavy Onslaught cannons from the other two made quick work of the Razorback, but the resulting explosion resulted in his 5 man combat squad getting wiped off the board.  First Blood to DAD!


Top of his turn, be dropped the other tactical squad and Contemptor and moved them up towards objectives to determine where it was.  He used deepstrike to deploy the 2 Cataphractii units and the Assault squad, and then sped the StormRaven on a flanking maneuver to try to take out the Xiphon. Between the StormRaven and his Contemptor, and timely use of the Flakk Missile Strategem, Gerrit quickly laid some serious hurt on the Xiphon, totally 8 wounds in a single turn of shooting. His ranged Cataphractii unit discovered the objective, and now he had to sit on it until bottom of turn 5 to win the game. His Cataphractii ranged unit got off some lucky shots at the farmost Repulsor, resulting in a wound and his Assault Squad overcharged their pistols, causing 4 more, but killing off one of their own.

Turn 2

I started off turn 2 by deploying my Primaris Marines from the Repulsors, and moving the Repulsors back.  His squads pack a ton of hurt in melee, and I was not ready to deal with losing my weight of fire.  The Hellblasters directed their fury at the StormRaven, reducing a further 5 wounds, totalling 9.  I used the Xiphon, to put more wounds on it, but it hung around, flitting by with 3 wounds.  I used the weight of fire from the 2 of the repulsors to pummel that assault squad, and then used the twin las to finally plink the last few wounds off the StormRaven. The Intercessors with the Librarian cursed him for forgetting the words to the Smite spell, and turned their fire on the 5 man Intercessor squad, removing a model.  The other Intercessor squad spat death at the full strength tactical squad, and was rewarded with 3 casualties.


Gerrit moved his Chaplain up, to make sure that both Catphractii units could take full advantage of the Litanies of Hate. His Gravis Captain caame down off his perch to attempt to fortify the Intercessor squad being harried by their blue counterparts.  Powerfist Cataphractii Terminators and the lone Assault Sergeant converged on the hated Hellblasters, pouring fire with combi-bolter and bolt pistol alike, bring down a full half of the squad thanks to my poor rolling. His Cataphractii ranged squad roared their fury and charged headlong into the Hellblaster squad, and crushed them to pulp, while the assault sergeant showed the Apothecary how to properly smite a foe, and crushed him where he stood. His assault Cataphractii unit and Intercessors charged the Ultramarine Lieutenant's Intercessor Squad, and Ancient Kickassimus, the Contemptor dread waded in, much to the chagrin of the Lieutenant.  Although the Ultramarine Intercessor squad was quickly dispatched, the Lieutenant answered by slaying all but the Sergeant of the Imperial Fists Intercessor squad.


Turn 3

Things were still looking good for the boys in blue.  I turned the Xiphon back up field, and prepared to lay the hurt on the Contemptor, if I could just get it out of combat. The Cataphractii Assault Squad and Contemptor were taking a horrible toll on my foot troops, so they needed to be dealt with. The librarian was finally able to remember his spells, and used Psychic Scourge and  Fury of the Ancients to put some wounds on the Gravis Captain, who was then rapid fired by the Intercessor squad.  I poured fire with onslaught and heavy onslaught alike, and the insane powerful shots from the Xiphon, but the danged Cataphractii and Contemptor are just hard nuts to crack. Atomantic invulnerable saves are a pain!!!! I was finally able to remove the last 3 tactical marines, reducing my sons anti tank capability to the Contemptor and melee. Finishing off the Fight phase, his Lightning claw terminators and contemptor wrecked the unit of Intercessors, leaving the Ultramarines Lieutenant to carve through the last of the Imperial Fists intercessors.


Gerrit's turn saw lots of action!  His ranged and melee Cataphractii moved up, and engaged a Repulsor at point blank range.  Due to some great rolling (and Lieutenant allowing re-rolls of 1s), as well as some poor rolling on his part, the Repulsor took out all but 1 lightning claw Cataphractii on overwatch, while the ranged Cataphractii and Contemptor Dread engaged it and removed the last of it's wounds, resulting in a spectactular explosion that took the last of his melee Cataphractii off the board.  His ranged cataphractii, after destroying the Repulsor, backed off to attempt to move back to the objective.

Turn 4


I had 2 turns left to stop him from holding the objective, and that Dread would not DIE!.  The Cataphractii parked on the objective, coupled with the Chaplain, meant that I needed to deal with them at range if possible, and then try to push him off the objective, or, at a minimum, contest it. The Lieutenant and Chaplain advanced on the objective and the Catphractii, and I threw Smite and  Psychic Scourge at his chaplain, removing him in a puff of aetheric agony. I moved the remaining intercessors up to engage the Cataphractii, and poured all the fire into them that I couldm reducing them to 2 models.  The Repulsors onslaught/Heavy onslaught cannons did the trick of removing the last 2 terminators, while the twin lascannons and xiphon missile battery peeled a few more wounds off the dread, reducing it to just 4 wounds remaining, which I felt my Intercessors could more than take care of.  I declared my charge and rushed in, but the Contemptor peeled off an intercessor with some fantastic rolling on the dread.  Once engaged, I failed to wound it at all, however, the Contemptor hammered at my squad, reducing it to 3 models.


At this point, the boy was losing heart, so we discussed his options to try to pull off a win.  I advised him that he could retreat his dread from combat, and try to get it to within range of the objective, which I firmly had 2 models parked on.  He opted to do this, and moved his Dread back out of combat to get away from the Intercessors. As this would not allow him to charge or shoot this turn, it quickly ended.

Turn 5

At this point, I knew that I had to get rid of that dread, but it was being stubborn.  He had removed himself from combat, had 4 wounds remaining, and it was being stubborn.  I left my models where they were, knowing that if I engaged him in melee again, he would destroy my last 3 intercessors, so I opted to try to shoot him down, both with psychic and ranged fire.  Of course, my rolls, even with burning my last CP to re-roll, were terrible, resulting in 2 failed attempts for Smite and Scourge.  Shooting produced nothing, as the Dice god of 1 seemed to be grinning at me like an idiot.  My son made the most fantastic 4+ invulnerable rolls that I think if he hadn't been rolling in plain site, I would never have believed it.  My turn ended with me knowing he was going to win the game, and I was okay with it.


That dread moved up, shot the crap out of the Lieutenant, and killed him on the spot, and he quickly declared a charge on the librarian, who failed to hit with his paltry bolt pistol, so was quickly and thoroughly smooshed by a very angry Power Fist.  So here, at the end of the game, sat a most triumphant Contemptor Dread, and a very happy son and dad.

All in all a very tough game for him, but a real good learning experience.  At the middle of turn 4 he was ready to give up and I helped him along with the game because I knew he could win.  In the end, we had a Contemptor with 4 wounds remaining, sitting at the top of the stack.  I did tell him that next time, we would work harder on his list and build one around Lysander so that he could field the units that he loves and have a good time with it. Terminators of all kinds, Centurions, Contemptor Dread, and his StormRaven and StormHawk (I have to build and paint that yet).

A couple of notes:
  • We did not draw tactical objective cards as we were playing a game with a sudden death scenario, as drawn from the open play deck.  We did not use twists or anything further than scenario and deployment.
  • We both forgot about warlord traits, and we both had to remind each other of Command Points and Strategems that we could employ.  I used mine for strictly re-rolls, but with 6 CP to use, he made good use of the other strategems, especially flakk missiles to almost bring the Xiphon down.
  • Don't give me crap about the unpainted terrain.  I plan to get some work in on that next week.
  • Last turn I did move the Xiphon, but it ended up being in the way for good pictures to show his victory, so we moved it back. 

Hope you all enjoyed reading as much as we did playing!


10/8/17

Mortarion - Unboxing video, breaking into sub assemblies, and finished model!

So, Tyler has asked that I paint him up a Mortarion.  Since this is my first go round with this extremely large and fantastic model, figured I would do a few items leadinng up to painting him.

First, an unboxing video.

Okay, this is a HUGE model, and they crammed all of his pieces into 2 sprues.  The parts are scattered everywhere, and I scratched my head when looking at the arms.  That scythe arm, no matter which way you configure the model, seemed to be off.


I assembled the scythe arm, but after the glue dried, I used my razor saw to cut the forward part of the scythe off, and turned it so it was a more actionable pose


Okay, so I broke the model up into 2 groups, based on primer to be used.


For the wings, nurglings, fly guys, billowy smoke, and base, I opted to go with Vallejo 73.615 USN Light Ghost Grey.  In addition, I did some pre-painting, namely on the wings.  I went from LGG almost to black on the wings, mixing in small amounts of Vallejo 74.602 black primer.  This will be further blended with successive drybrush highlights on the wings and billowy smoke.


For the main body, I went with Vallejo 73.609 Russian Green.  It has a rich olive drab color, and works great for a nice base to Mortation.


Here we are, all primed up.  I left the arms, head, and wings off for ease of painting.  I will assemble as I go, starting with the main body, then the arms, head, then wings, and finally, attachment to the base, and then the addition of the little dudes here and there.

This model is going to be fun!

I painted him over the course of 3 days, spending maybe 5 hours a day on him.

As far as the assemblies went, here is the progression that I did:
I painted the entire model to match the color choices of the Death Guard Squad I painted here.

After the full strength wash of GW Agrax Earthshade and allowing it to dry, I attached the arms to the model. I then followed the instructions to completion, adding smaller details as I went.  I left the wings to the end, as they are big and cumbersome.

For painting the wings, I applied successive drybrush highlights, going through GW Eshin, Administratum, Dawnstone, and Ulthuan Grey, feathering it out towards the edges. I picked out the little boils in GW Emporer's Children Pink, and Leadbelcher to the piping parts.

I then applied a thin glaze (50% Lamhian Medium, 50% Agrax) of GW Agrax to the wings, making sure it did not pool up.


You can see the red really offsets the body, and makes the focus point his body, and not the wings.


You can see the striations of grey that were originally airbrushed on, going from dark to light grey.


For his face, I stuck with the lightest grey used, and then applied an Agrax Earthshade wash.


And this is why I love taking pictures of my models after they are finished - I can see things I missed, like the little spikes holding the purple cloth on.


Here is a better picture of the flipped scythe blade.  When I attached the billowing smoke piece, I turned it to look as if he had the scythe going through a back swing, after having reaped the enemy with it.


And some poor slob is going to be looking down the barrel of the lantern soon enough! I left the extra nurglings off the base because I thought that they looked dumb.  I mean, the little fly guys were cool enough and tie into the model, but the other ones don't really tie in as well, so would have been a detraction, at least to me, with the final model.

A blast to paint, but a beast if not broken into assemblies before hand.  Now, go forth and do Grandpa Nurgle's Bidding my friends!

9/29/17

Blood and Skulls Industries Sagittarius Kit - Wrap that Land Raider in tracky goodness!

Rejoice modellers!  Well, okay, I know I did today when I opened my mailbox and found my package from Blood and Skulls Industries.  I am working on an Ultramarine army for contract, and needed a couple of twin assault cannon turrets for some Razorbacks.

I did an unboxing and assembly video on those here.

Further, tucked away in said shipping container was one of Blood and Skulls brandy new Sagittarius Conversion Kits, with Oppressor tracks.

For this, I shot an unboxing video, as well as shot an assembly video for a single side.

I wanted to get a step by step assembly article written on these as well, so people would can have a visual reference when assembling.

Okay, a bit about this kit.  It is a collaboration between Tom, the owner of Blood and Skulls, and a guy named Maarten.  Maarten (that is the Dutch spelling) designed the kit in CAD, and Tom went to work making the parts and casting the kits. It works and can be selected with all three versions of the 080 tracks - Oppressor, Liberator, and Krusher. According to Blood and Skulls, the Liberator is his most popular Sagitarius Kit, with almost 40 sold since it's release at the middle of last month. This kit is HOT HOT HOT!


Putting It Together


I started off, working on the other half of the Land Raider kit.  It is easier to assembly the sides with tracks first, and then do the final assembly.  Less to handle, and with the Oppressor tracks, less chances of poking your fingers. There are some other assembly tutorials out there that say to attach the guide wheel assemblies first, then assemble the hull halves, but I did not find this to be a problem. 


This is the guide wheel assembly pic from the eBay listing.  I did not glue them all together, but instead, did a dry fit and glue in place directly to the hull. The kit has separate parts for each side, so a dry fit before glue is a MUST.


The tolerances on the kit are also pretty tight as well.  When doing the final assembly, I had to make sure to press down hard to get the piece to "Click" into place.


I used the track assembly guide from the kit to put the tracks on, once the guide wheels were dry.


I started with the top and front sections, and worked my way around to the rear of the hull.


I had 0 fitment issues on this side, but the first side, I had to do some mad filing on the joint in the back.  I think, however that is my fault (in a rush to assemble the kit) than any fault in the kit.  Had I taken the extra couple of minutes to file the track starts and ends like I did for this side, it would not have been an issue.


So, as you can see, this kit made the boring, ho hum Land Raider into a crushy, bladey, vehicle of death.  And, as with all of Blood and Skulls track kits, there were extra links left over, and so I stuck them to the front of the assault ramp because Chaos, that's why.


I really enjoyed this kit.  Inn a conversation with Tom, he stated that he was concerned about clearance issues with the assault ramp opening assembly.  I normally glue my Land Raiders shut, so this wasn't an issue, but when I get the Krusher kit in for the Death Guard Land Raider, I will test that out for him.

The last thing, before assembling the tank is the rear section. No need to cut down the top plate from the LR, although you could if you wanted.  This piece fits better than the GW front Hull section, isn't warped like Forge World resin, and goes on fast and easy.  Just remember, if you are assembling the side hulls before the main body - DON't FORGET THIS PIECE.  I did, and thank the paint gods I used plastic glue on the plastic parts, otherwise, this thing would have been a drop top!


Now to convince Blood and Skulls to do some armor banding and some Chaosy bits to adorn this bad boy.  The Thousand Sons have a new ride, and need it suitably detailed before crawling into it.


Hope everyone enjoys!