Commission Painting and Pricing

Yes, I do take commissions.

Infantry are $15 a model, regardless of size, up to 32mm round base.
Large Infantry and Cavalry are $30 a model, up to 50mm round base.
Extra Large Infantry are $45 a model, up to 60mm round base.
Vehicles are based on size:
$150 for 40k dread sized (60mm base)
$200 for 40k Rhino chassis or similar, smaller fliers (Storm Talon)
$400 for 40k Land Raider, larger fliers (Storm Raven).
Forge World and Collossals - prices vary

These prices include all assembly and basing. If you already have models assembled, primed, or want to do the basing yourself, please contact me and we can talk about reducing the price.

What you get for your money - models will be cleaned of any mold lines and flash, assembled, primed, painted, based, and matte varnished for protection. Will always be beyond the 3 color minimum for tournaments, and will include the little details that we all want. I will paint an army for you that I would be proud to play with myself. I will do custom color schemes, as well as traditional "from the book" schemes. I only have one level, and that is fully painted.

About Me

I paint models and have been doing it since I was 12. Over the years I have learned tons of tricks and painted loads of models. I have ran a very successful Miniatures studio, and owned a Retail Game Store. After closing those, I decided to get a little smaller with the operation and I am back to a one man show.

Search This Blog

10/31/14

Space wolf painting walk through - pack shoulder pads

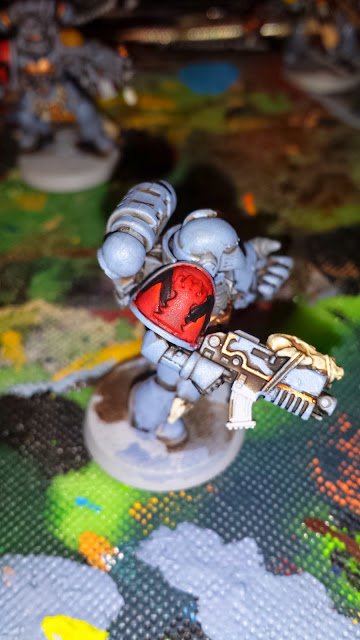
As promised, here is the additional walkthrough for painting pack marking shoulderpads. I would do them at the same time that I would be painting the yellow shoulderpads.


Step 1 -  Paint the shoulderpad interior with GW Evil Suns Scarlet.  Nice thin layers will get a nice bright solid base coat.


Step 2 - In the areas to stay red, highlight with GW Wild Rider Red. Follow this up with a top edge highlight of GW Troll Slayer Orange.  Once dry, use GW Carrowberg Crimson wash, as a glaze over the red.
 

 Step 4 - Once the red glaze is dry, take GW Abaddon Black and paint the contrasting color for the pack.  Highlight the black with P3 Coal Black.
 

Step 5 - On the pack honor marking, paint the mark with P3 Frostbite.  Glaze this with a 50/50 mix of GW Nuln Oil and Drakenhoff Nightshade.  Once dry, layer GW White Scar onto the marking to highlight the Frostbite. 

New Space Wolf walk through

I figured it was about time for an updated walkthough on painting Space Wolves.  

This will be the 4th incarnation of a Space Wolf Army for me. My first was a very shadow grey with black tiger stripe camo from 1st edition, followed up with a 3rd/4th edition army, then a 5/6th edition Razorback Mech list, WolfWing, and TWolf cav lists (3 different armies), and now the current one, my daughters 7th edition Space Wolves army.  I did her paint scheme a lot different than these ones picture below, however I have an extra Grey Hunters Squad with Wolf Guard Battle Leader that I wanted to paint up a bit closer to the GW method for painting Space Wolves.


Step 1 - I started with a grey primer.  Trying out some different ones since the GW and Army Painter ones are just too danged expensive when I am averaging a full unit every night.  These guys were primed with Rustoleum light grey automotive primer. After that is dry, apply Russ Grey (GW) to all of the armor plates.


Step 2. Since I am working on a batch painting process, I went ahead and painted all the areas that were to be gold/bronze with VGC Brassy Brass, yellow areas with GW Averland Sunset, pelts with GW Rhinox Hide, bone areas with GW Ushabti Bone, and flesh areas with VMC Flat Flesh.  After all of this was dry, I washed the entire model with GW Argrax Earthshade.


Step 3.  Re-apply Russ Grey (GW) to all of the armor plates, leaving the wash in the cracks. Apply the first layer to the yellow with GW Yriel Yellow, leaving the wash in the crack. All metal parts to be silver were painted with GW Leadbelcher, and then washed with GW Nuln Oil. At this point, we have a good tabletop quality mini, but I wanted to go a bit further with it.
 

Step 4 -  Highlight all gold/bronze areas with GW Gahenna Gold, silver areas with GW Runefang Steel, armor plates with GW Fenrisian Grey.  Yellow areas get a layer buildup of GW Flash Git yellow.
 

Step 4 - Highlight the face with VMC Flat Flesh. Yellow areas get a highlight of 50/50 mix GW White Scar and Flash Git Yellow. Armor areas get a final small edge highlight of P3 Frostbite. A quick drybrush on the pelts and tails of GW Ushabti bone, and then follow this up with a light wash of GW Agrax Earthshade.
 

And here is the finished model, ready to base.  Good times - now I just need to go and paint the 10 man squad that goes with him! I will add more steps as the Grey Hunters will have red, black and white areas on them as well, so will cover how to do those colors as well.  


10/13/14

Holy Crap!

Holy Crap - Has it really been over a year since I updated this blog???

I guess I will need to change that.